


It’s been two years since we first broke ground on my first self-storage facility.
Now that we've been open for about a year, I wanted to reflect on what's happened over the past two years and share some of the biggest lessons I've learned along the way.
I won't get too deep into the details of the self-storage business model because that's a whole other conversation. But in this blog post, I'm going to talk about why I chose to get into this business, why I decided to build (instead of buying an existing one), what the experience was like, and a ton of other lessons I learned along the way about what I would do differently.
If you ever decide to build a self-storage facility or something similar in the future, you can probably learn a lot from what I went through.
The Land Flipping “Hamster Wheel”
For years, I've been pretty comfortable in the land-flipping business. The profit margins are great, and it's a beautifully simple model. This is why I’ve been sharing everything I’ve learned about on REtipster and in the Land Investing Masterclass.
But here's the thing. Like any property flipping business, the land business is a hamster wheel. It's a hamster wheel that pays extremely well, but it's still a hamster wheel. If you ever want the freedom to pull the plug and get off that hamster wheel and still make a great income with minimal ongoing work, you have to start looking at long-term buy-and-hold assets.

After looking at the various options for years, I kept coming back to self-storage. Similar to land investing, it’s a fairly simple business, and the properties aren’t a huge hassle to look after. After all, they require no plumbing, no electricity, no heat. Just simple units where people can store their stuff, generating cash flow day in and day out.
How My Self-Storage Journey Started
For me, the journey into this business started back in early 2020. I had gotten connected with a few people who were early on in their self-storage journey. They owned a few self-storage facilities, and I decided to form a mastermind group with them.
They were just a few steps ahead of me. They weren't like gurus. They didn't have thousands of units or a course to sell me, but they certainly knew more than I did and they were happy to share the real, unvarnished truth about the business with me.
As we got on Zoom calls every other week, I learned a ton of valuable information from these people about how the self-storage business really worked for small operators—warts and all. After spending a few months learning from these guys, I decided it was time to start sending out some direct mail within an hour’s drive of my home to see if I could find an existing facility to buy.
The result? I got five calls back. Three of them wanted to know if I had found any deals I could pass along to them, while two tried to sell me their facilities for 2X what they were worth.
After keeping an eye out and listening to chatter in other self-storage communities online for many months, I eventually realized it just wasn't a good time to be a self-storage buyer. The market was inflated and becoming even more inflated as the months passed by, and the deals frankly weren't there.
“Fine, I’ll Do It Myself”
It was around this time that I started thinking more seriously about actually building one of these things.
Normally, I would never dream of building anything on raw land like this. Developing vacant land wasn’t even on my radar, nor did I find it appealing. After all, that's why I spent so many years flipping land instead of flipping houses: I didn't want to deal with all those unpredictable costs and moving pieces!
Honestly, I’m not the kind of person who does this stuff, with all of the risk, expenses, and uncertainty.
But at the same time, the numbers didn't lie. I could not find anything even close to a deal in my market, and I saw many people legitimately overpaying for facilities, even ones that were dumpy and empty.
So I figured maybe I could actually make this thing work. Even if I screwed it all up and overspent on it, it still wouldn't be that hard to sell what I had built and get all my money back if I really needed to.
This was the moment when I realized that building from the ground up might make sense for me. And this realization kicked off a two-year journey.
The Seven Steps
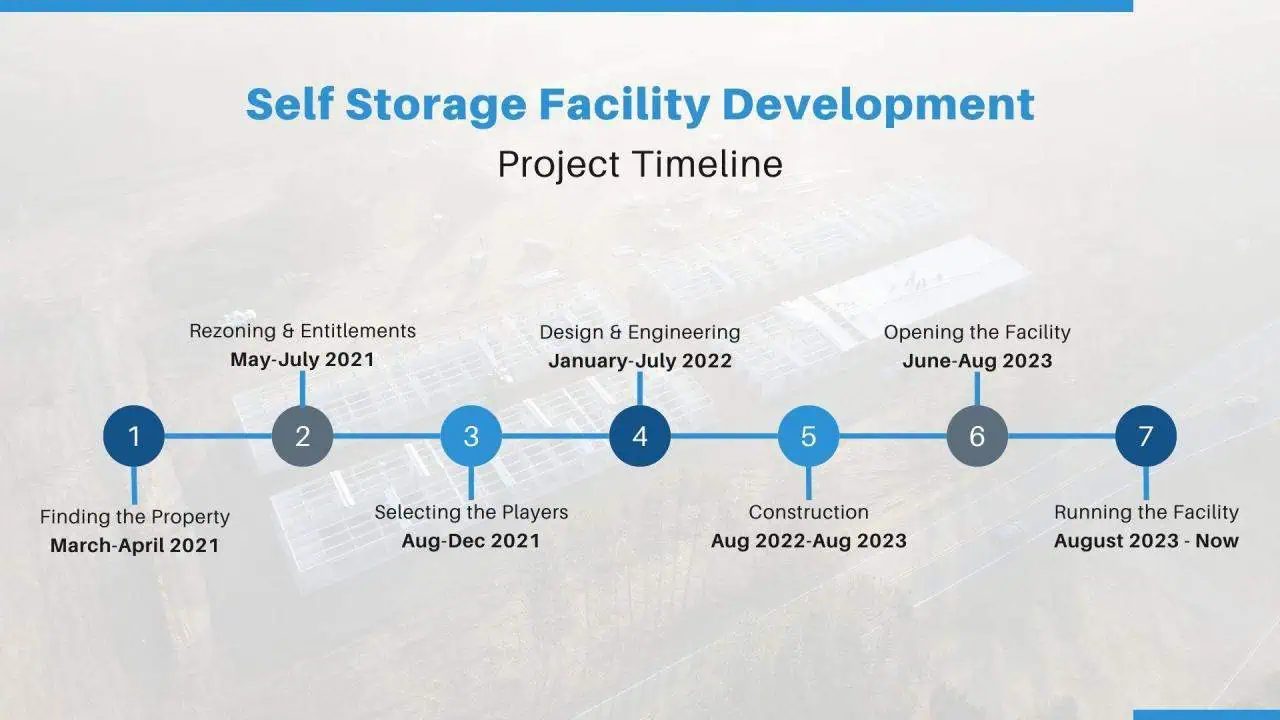
I've broken down this journey into seven steps. Each step has a lot of detail and narrative baked into it, more than I can explain right here. But I'm going to try to walk you through each stage and share the most important details along with the biggest lessons I learned each step of the way.
Step One: Finding the Right Property
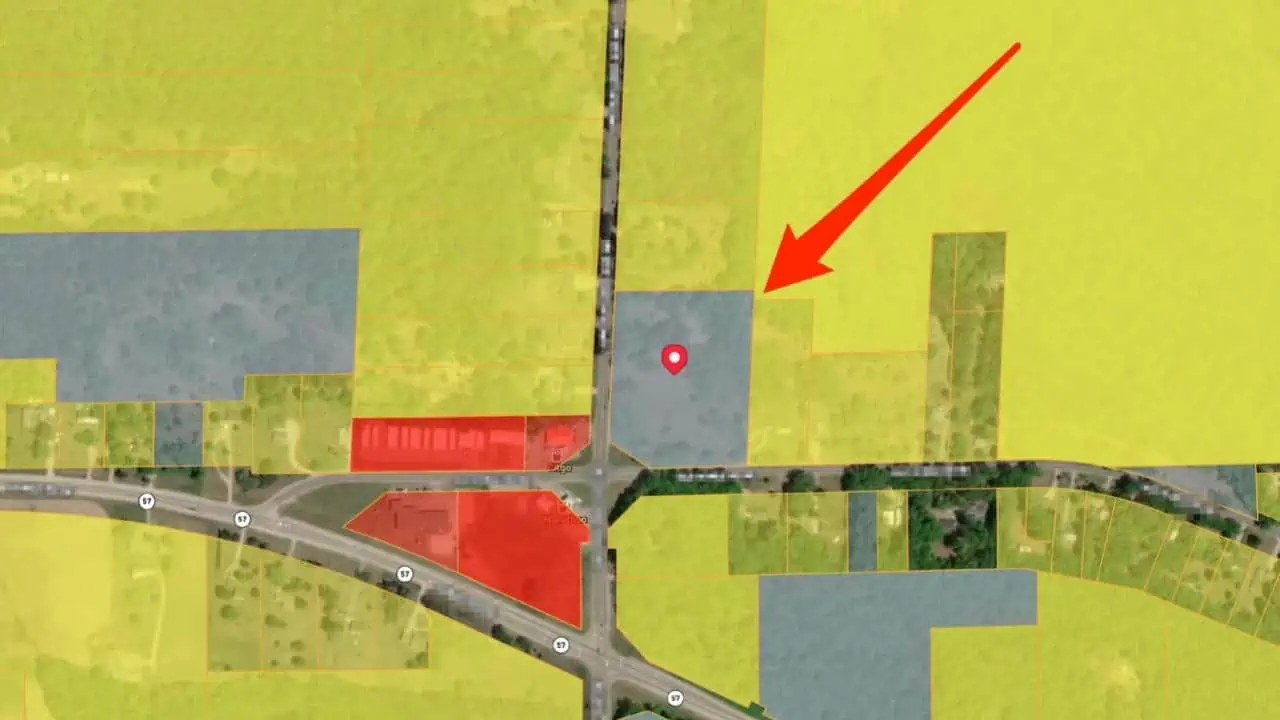
Once I had this new construction idea, I started using the same online resources I used to find land deals. I figured if I could find land already zoned commercial, building a self-storage facility would be easier.
In March of 2021, I came across a 6.7-acre parcel of land about 20 minutes from where I lived. It was zoned residential, but I knew if I could get the property rezoned, the size and price of the parcel would be just about right for what I needed.
Step Two: Getting Permits and Approvals

From May to July of that year, I needed to obtain the necessary permits and approvals from the local government. This was another big step because it involved a lot of paperwork and red tape. I had to work with the city planning department, the building department, and the fire department.
Surprisingly, rezoning wasn't as scary as I thought. It cost $600 and required two meetings with the township. Being in a rural area definitely helped since things tend to be more straightforward with less red tape than in big cities.
Another key step was getting a feasibility study. This cost $6,300, but it was worth every cent because it gave me valuable insights into market demand, potential pricing, and construction costs.
My advice is to talk to the zoning administrator before buying. They can give you a heads-up on potential issues. Also consider putting an option on the property or negotiating a longer closing timeline to give yourself wiggle room for approvals.
Lesson: It’s far, far easier if you could buy an existing facility instead of building one yourself. Otherwise, prepare to deal with a lot of bureaucracy. It can be frustrating, but it's important to be patient and persistent.
Step Three: Bank Financing
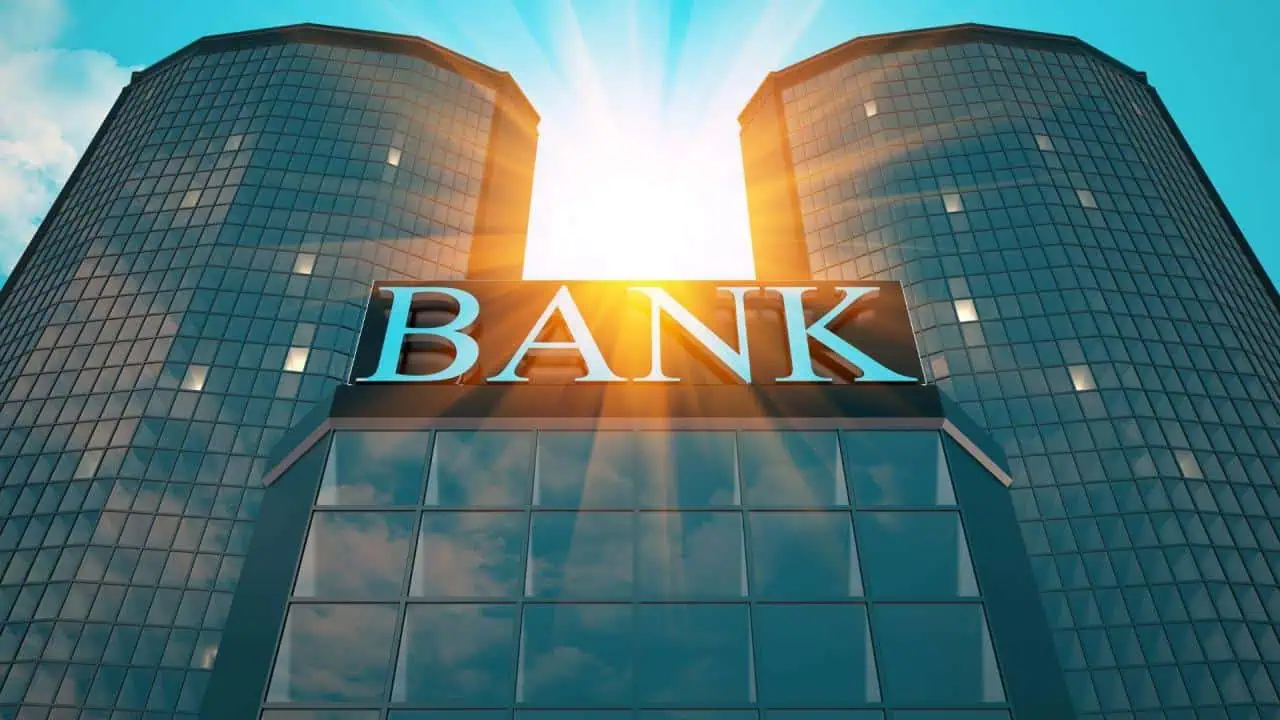
After I found the perfect piece of land and got it rezoned, I needed to figure out how I would pay for this construction project.
I started by talking to some of the banks that I had worked with in my past career in the commercial banking industry.
Luckily, I knew exactly what they were looking for, and had appropriate expectations for how much time and work it would take, but unfortunately, it took this first bank several months to approve my project, and I knew it should have taken them just a few weeks.
By the time they finally issued my approval, I had learned about another local bank that was offering much better terms, so I sent them all the same information I had sent to Bank #1, along with Bank #1’s approval letter, and then Bank #2 approved it in just a couple of weeks.
Lesson: When you’re getting approved for bank financing, it’s okay to shop your deal around to two or more banks until you find one that meets your budget. Having more options to choose from is a good thing, and it’s usually not much more work, because each bank will require most of the exact same information.
Step Four: Designing and Engineering
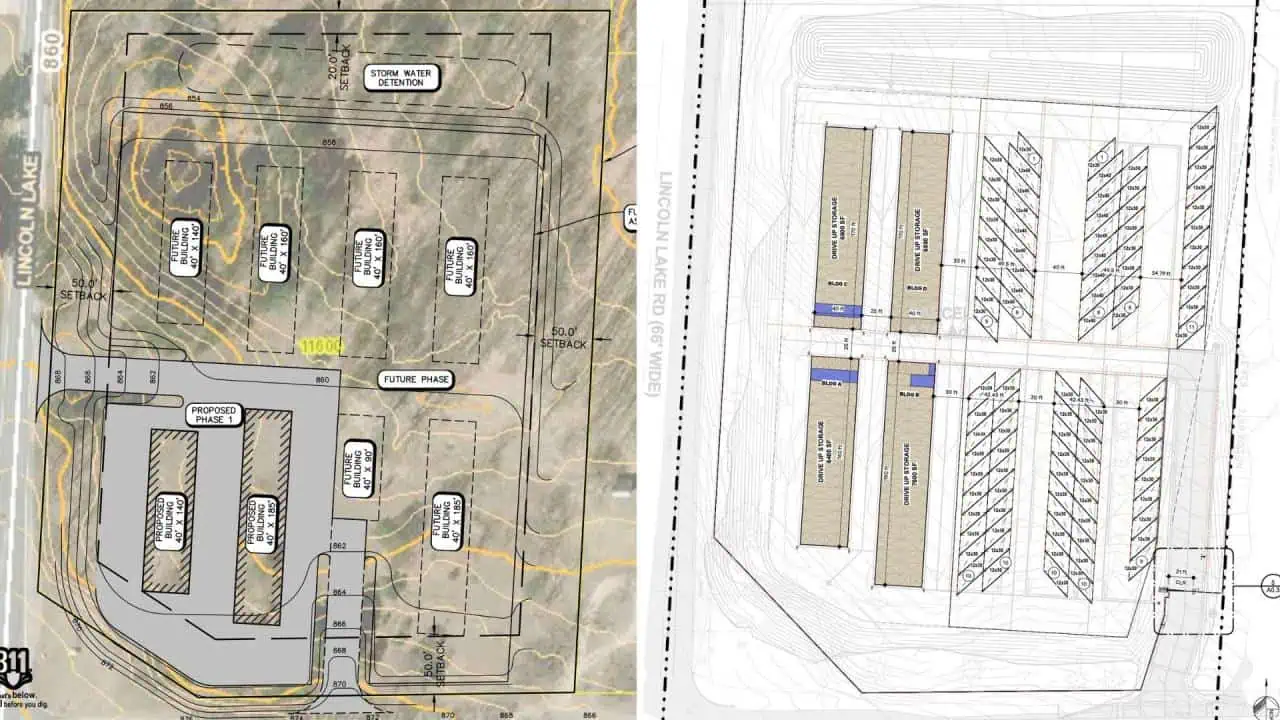
The construction drawings for what would eventually be my self-storage facility. On the left is the preliminary site drawing; on the right is the more detailed, final drawing.
When it was time to assemble the team to put all this in motion, things started to get a bit complex. I realized I needed several professionals to help me with the project: four types of engineers (civil, structural, architectural, and electrical), a surveyor, and a general contractor. And then, this general contractor would work with their own team of subcontractors.
I spent about four months from August to December 2021 assembling the dream team and another seven months from January 2022 to July 2022 designing the development.
All in all, this stage cost $51,000 to design the new facility and get precise construction drawings.
We hit a couple of snags in this phase.
For example, some of my engineers were from Colorado, using building codes that didn't apply to my home state of Michigan. One example is that the requirements for the foundations vastly differed across these two states. The initial foundation design was overkill for our needs, and it took some time to iron this out and get on the same page.
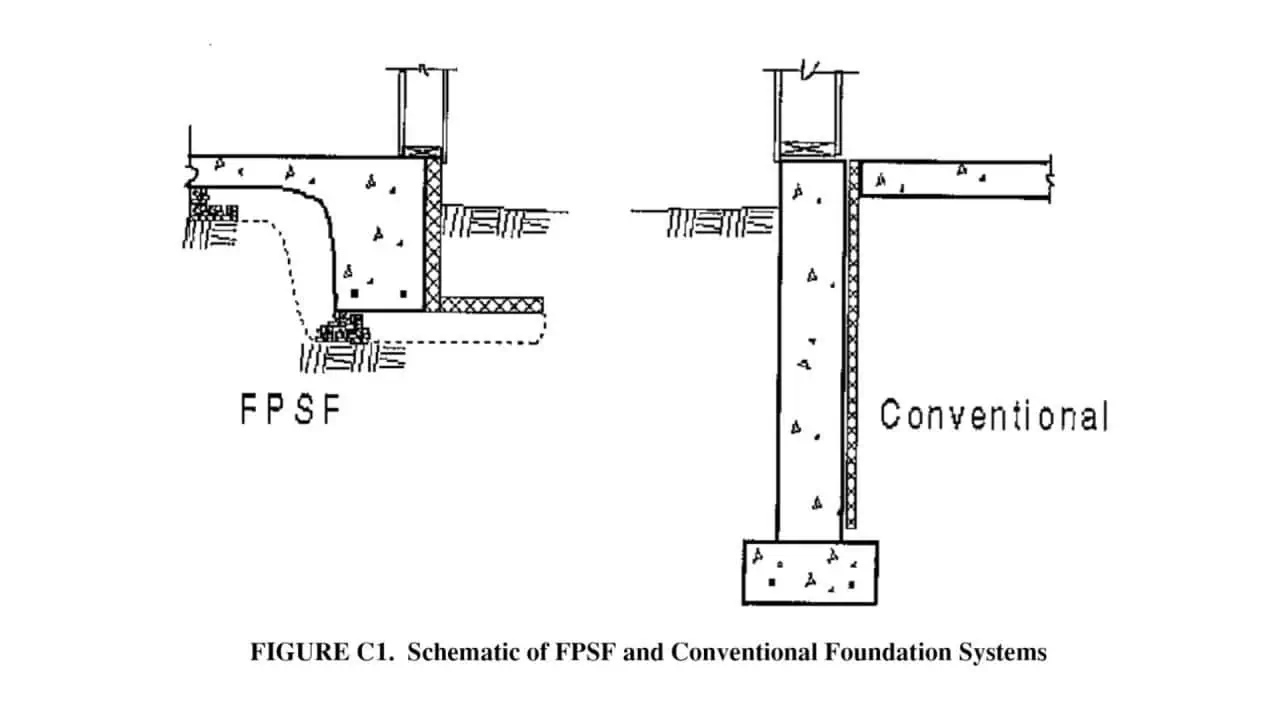
The engineer wanted me to pour a concrete stem wall foundation (right) with footings that go down 12 inches and require foam insulation around it. This wasn't necessary for a cold storage building, as all we needed was a monolithic foundation (left), which didn’t require nearly as much concrete and no insulation.
My general contractor caught these issues and, in the process, saved us tons of money.
Lesson: Pick your general contractor first. They're the conductor of this orchestra, and having them involved early can save you time and money. My GC caught several issues that saved us hundreds of thousands of dollars. Also, you must double-check their work, even if they’re the experts, don’t expect them to be perfect and do flawless work.
Step Five: Construction
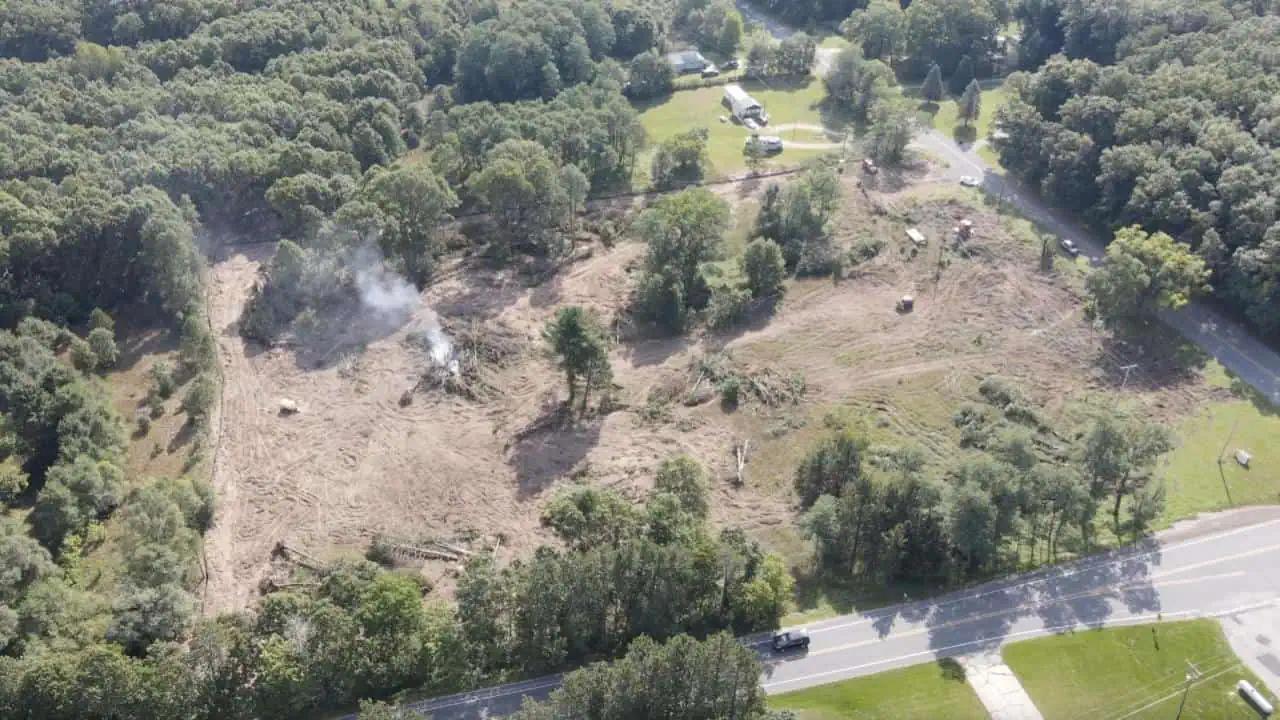
Finally, in August 2022, we started clearing trees. Originally, I wanted to sell this land’s timber to a sawmill, but I quickly realized that the plot of land was too small and the timber wasn’t valuable or usable enough—they’re mainly young red pines or small oaks. I even offered the timber to them for free, but they didn’t want it!
I ended up paying $30,000 to remove them, although I saved some money by clearing them and burning them all on-site instead of trucking them and burning them elsewhere.
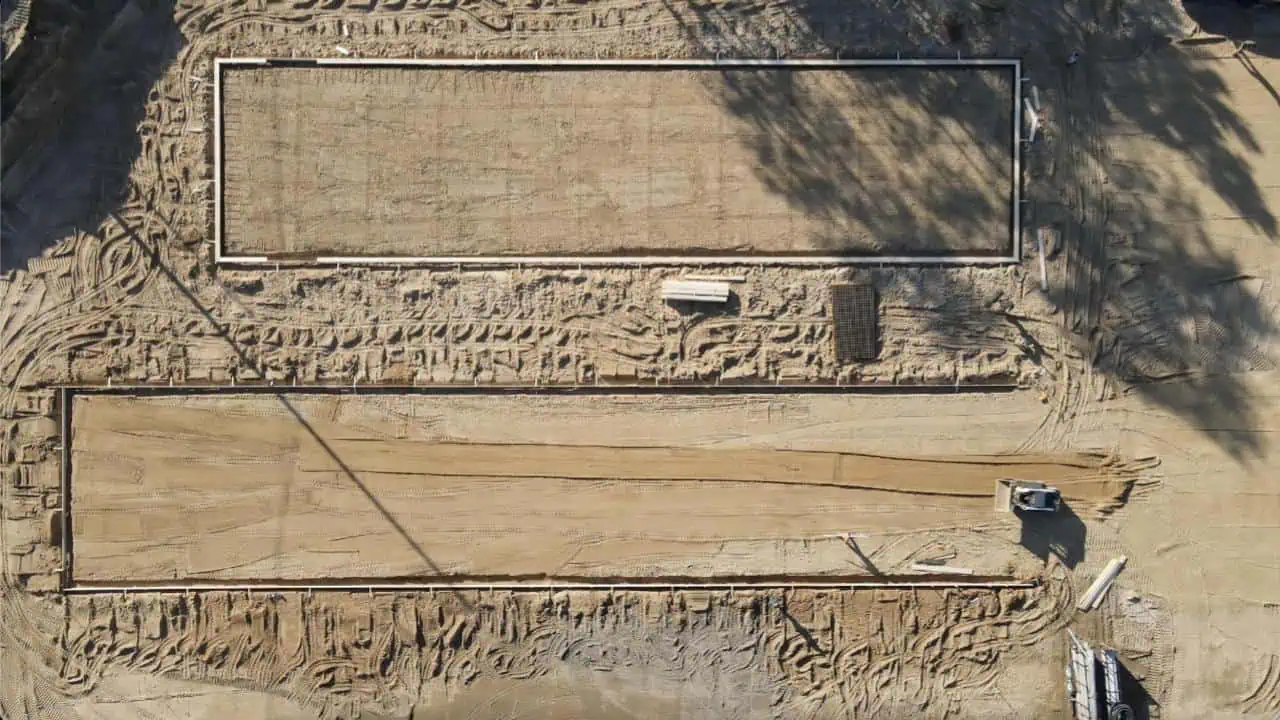
Next was excavation, which took over two months. It took so long because the parcel wasn’t level, with some declines and steep inclines, particularly on the southwest corner. After much thinking, we found a way to lay out the site in a way that would still be expensive but would cost less than some of the alternative designs we first came up with. We did this by putting the driveway entrance on the east side of the property instead of leveling it all with the road, which would’ve required an additional 15,000 yards of soil to fill it out.
Overall, the cost of the excavation was almost $400,000, and it could have been even more.
Lesson: Flat land is worth its weight in gold when building on or developing land. Take this into account when making an offer to buy the land. There can be a lot of hidden excavation costs if the land isn’t level. Your topographic survey is an invaluable tool when developing land like this.
In October 2022, we started pouring foundations. We had a tight timeline and unpredictable weather, compounded by an ill-timed concrete shortage in Michigan that year. It took over 50 trucks of cement to pour four foundations. Somehow, it all came together just days before the steel buildings arrived, delivered in several semi-trucks.
The buildings took about three months to assemble, with the crew (12 of them staying on-site) working through Michigan's worst winter weather. I felt for those guys fumbling with tiny screws in freezing temperatures, but my hat’s off to them for getting it done.
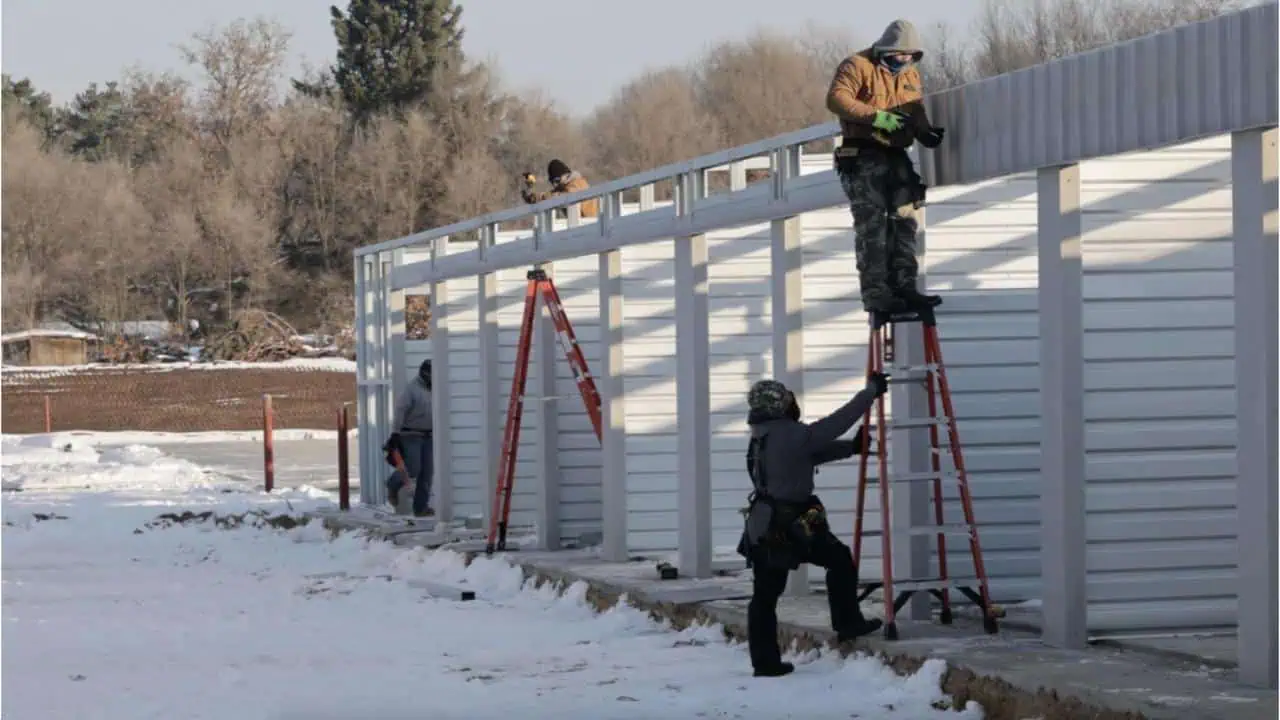
These gentlemen worked through the worst of Michigan's winter weather to set the facility up. Props to them.
Lesson: Anticipate and account for unexpected problems and delays. Construction projects are always full of surprises. You need to be flexible and able to adapt to changing circumstances.
Step Six: Finishing Touches
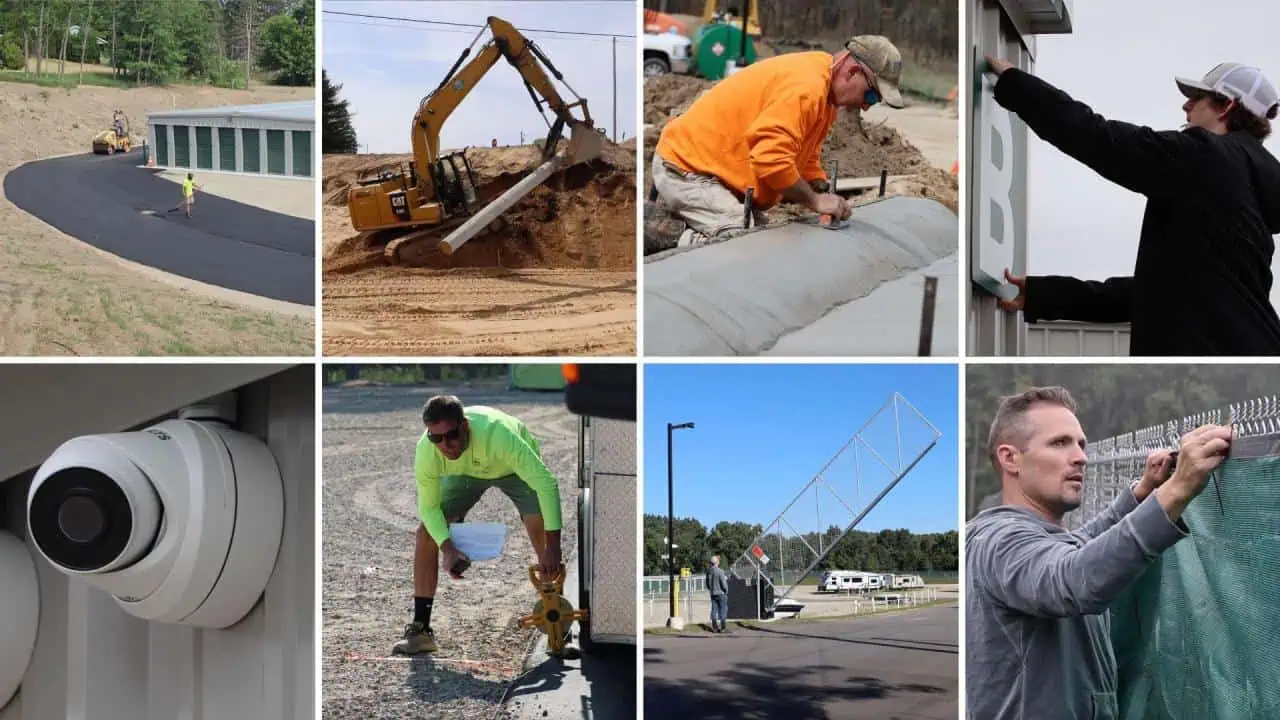
After the buildings had been erected, the door installation took about a week afterward, and we had a little bit of drama with it due to the local installer we hired. When the roll-up doors were done, it took us some more time to apply the finishing touches, such as security cameras, fences, asphalt, signage, the gate, gravel parking lots, you name it.
Lesson: The “finishing touches” require a lot of work and attention to detail, since there are many moving parts.
Step Seven: Opening
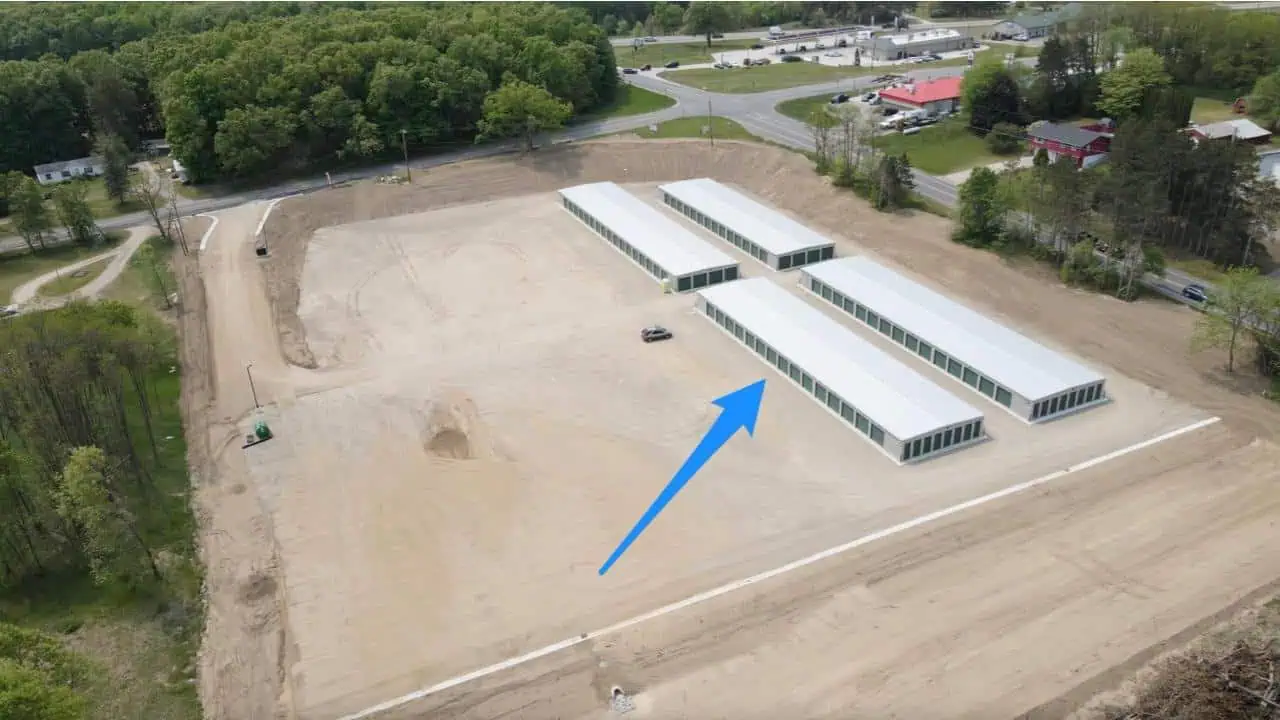
In June 2023, we opened Building D.
In June 2023, we received a temporary certificate of occupancy, which allowed us to open one of our four buildings, allowing us to start getting tenants and revenue coming in.
In hindsight, this was good timing, since we were able to capture seasonal activity in Michigan during the summer of that year.
The full facility opened in August 2023. As of now (11 months later), we're about 40% occupied.
The Financial Reality of Self-Storage
Another big lesson I want you to take away is that you should not build a new facility unless you are 110% sure that there is sufficient demand in the market.
Also, keep in mind that when you open a new facility, it will be 100% empty, and it will take time for it to fill up. As of this writing, we're still losing money. Our monthly principal and interest payment is $9,500, and we're bringing in just over $8,000.
But that's expected—a new facility typically takes two to three years to stabilize, which is what we’re on track for. Plus, I planned for this, with $170,000 cash set aside to cover the initial losses, although I hope to break even by the end of this summer.

So, in terms of cash flow, it will take more than two years to become profitable. Fortunately, I'm playing the long game here.
The current market conditions, with higher interest rates, have slowed down the number of people moving, directly impacting the demand for self-storage. But this won't last forever since people always need to move eventually.
Financial Walkthrough
The financial viability and performance of a facility like this is a huge topic that frankly warrants an entirely separate video.
If you're curious about how I made the decision to build this facility (looking strictly at the numbers) and then how the facility actually ended up performing after we opened it up, I'll discuss all of that in this video.
Final Thoughts
Building this facility was a huge risk for a naturally cautious guy like me. But nothing moves forward in life without taking smart, calculated risks. If you've got a solid plan and the financial cushion to weather the storm, don't be afraid to step out of your comfort zone.
This project taught me more than I ever expected about construction, teamwork, and perseverance. While it's been challenging, it's also been incredibly rewarding to see this facility come to life.
Want to learn more? Check out my in-depth YouTube series documenting the entire process. And you can also find this detailed blog post, with a lot more information about what was involved in this project, from start to finish.
Below this post, there's a link with all the details, including a line-by-line breakdown of construction costs and a financial analysis of the project.
Thanks for reading, and I'll catch you in the next one!


Seth, love the details you choose to include, you’re a natural teacher and I’m thankful you have the reader/learner in mind as you write. I’m in Seattle, considering an occupation change, and the land-flipping world sounds super interesting to me.. Storage too though… question – what would you say is the MININAL number of square footage pf storage you’d say necessary to be worth it to develop your own self-storage facility?
Hi Ryan, thanks for the comment!
The square footage question just depends on how much money you’ll have to spend buying the land and doing the site work. When I say “site work,” I’m talking about everything you’ll have to pay for up until the point of constructing the buildings. The cost of buildings themselves are fairly easy to predict, but the hidden, ‘gotcha’ costs are the ones you’ll have to pay for to get the site ready, and it can be a bit of work to figure out what these will realistically be. Costs of excavation and foundations can be pretty huge, depending on what kind of work is needed. Not to mention, some sites might need environmental work or have other oddball issues that need to be resolved (like moving utility poles or paying for rezoning or entitlements, etc).
If the costs of site work are higher, you’d probably want to start with a minimum of 30-50,000 square feet. If the costs are low, you could probably get away with 15-20,000 square feet. The goal is to keep the final cost per sq ft at around $50-$65. My final cost per sq ft was around $73 for 27,600 square feet. If we had doubled the size of our buildings, our cost per sq ft would’ve looked a lot better (and it eventually will, when we expand the facility).
Sometimes I’ve seen people build very small facilities (like, 10,000 square feet or less), and usually, the way they’re able to do this and justify the costs is because they have some competitive advantage that allows them to build for cheap. For example, they be a general contractor or a concrete subcontractor who can pour their own foundations. This kind of thing would allow them to build a smaller facility at a lower cost than a ‘normal’ people like you and me.
I’m in Michigan as well and looking to do an expansion of about 20,000 sq/ft. Would LOVE to have the name of the GC you worked with. Thanks!
Cool! Where is your location at?
Hi Seth – Regarding the spreadsheets from your YT video series on this self-storage project….they are probably already on your website somewhere but couldn’t find them. Is there any way we could buy those spreadsheet templates from you?
We just flipped land to pay our civil engineer without coming out of pocket through your teachings and he slam dunked planning board approval for 48,000 Sq foot self-storage project site plan!!!! YES!!!! Thank you for your teachings!!!
Anyhow, would love to pay you for those spreadsheets you highlighted in your self-storage YouTube videos for our self-storage project.
Happy Holidays and thank you again for your life changing teachings on land flipping and self-storage asset collection.
Hey Sean, that is awesome! So cool to hear about your big project in the works! I’m glad this content helped.
I’ll send you an email with my spreadsheet. I hope it helps!