When I would drive by self-storage facilities as a kid, I always thought to myself:
“What a brilliant business idea. I bet those things make a ton of money!”
Years later, when I grew up and got my first job in commercial banking, I was fortunate enough to look behind the scenes and analyze some of these businesses to learn how they operate.
After seeing the cost of building a facility and how much income they could generate each month, it was exciting to see that many of my assumptions about this business were true!
Self-storage facility owners always seemed to do pretty well for themselves, and I wanted in on the action!
Unfortunately, I didn't have enough money to buy or build a self-storage facility back then, but I had seen hard evidence that this business was legit, and the seed of curiosity grew in my mind.
Learning the Self-Storage Business
Around 2018, I started looking into the self-storage opportunity more seriously.
After running a land investing business and building an online community for several years, I had saved enough cash to give this kind of business a real shot.
I got familiar with a few different educators in this space, and I put together a mastermind group with a few other self-storage owners I knew, where I learned how to realistically get into the business.
I learned about the many facets of finding and managing a self-storage facility.
- How to evaluate a market for supply and demand and the due diligence needed before buying one.
- The different types of self-storage facilities (drive-up ‘cold storage' units, climate-controlled, outdoor RV and boat storage, A, B, C-Class facilities, warehouse/office flex space, etc.).
- The complexities of managing a facility (hint: it's much easier than managing residential rentals, with enough challenges to keep things interesting).
I decided to send out a direct mail campaign to all the self-storage owners within a one-hour driving radius of my house, and after trying to contact over one hundred of them, I got a total of five responses.
Two of them were investors who didn't want to sell their property. They just wanted to know if I found any deals I could pass along to them.
The other three were willing to sell but wanted 2X higher than their facilities were worth.
Ground-Up Construction of a Self-Storage Facility
After many conversations with other investors and educators in the self-storage space, I heard that buying an existing facility is a better move than trying to build a new one from scratch, especially for a beginner.
Now that I've built one myself, I completely agree.
Why? There are a few reasons.
- New construction is expensive. When you're building something from nothing, there are a lot of moving pieces that can affect the total development cost. This makes it harder to predict your total upfront investment in the project. Even when your construction budget is established, the numbers can change as the facility is built over the next 6-12 months! In the worst-case scenario, if you don't hire the right people, it's not unheard of for contractors to disappear or run off with your cash.
- New construction is slow. Many obstacles can slow down or completely stop your progress as you try to build a facility. If you can't finish in time, you'll lose a lot of revenue, especially if you open in the middle of the winter, when demand for self-storage slows down.
- You'll start with an empty facility. When you build a new facility from nothing, you'll have to start operating with a very expensive building that produces zero cash flow on day one (as opposed to an existing facility that probably has some cash flow when you buy it). This means you'd better be very confident about the need for a new facility in the area. Even when you've done your homework and properly determined there's enough demand for a new facility, it typically takes 18 – 24 months for an empty facility to fill up to break even and even longer to turn a profit. That's a long time to lose money on a property (and you'll lose the most money at the very beginning of that timeframe when you're most vulnerable). As such, you must be in a solid financial position to cover your losses until the facility fills up.
I understood all this and completely agreed with the rationale of buying an existing facility, but it didn't change the fact that I couldn't find any good deals on existing facilities in my area.
It was a terrible time to be a self-storage buyer. Prices were high and going even higher, and storage facility owners didn't have much motivation to sell at a low enough price that would make sense to me.
Luckily, I stumbled across a local opportunity that would change everything.
Spotting the Opportunity (March 2021)
On a random afternoon in March of 2021, I was checking out land listings on LandSearch when I came across a 6.7-acre vacant residential lot not far from where I lived.
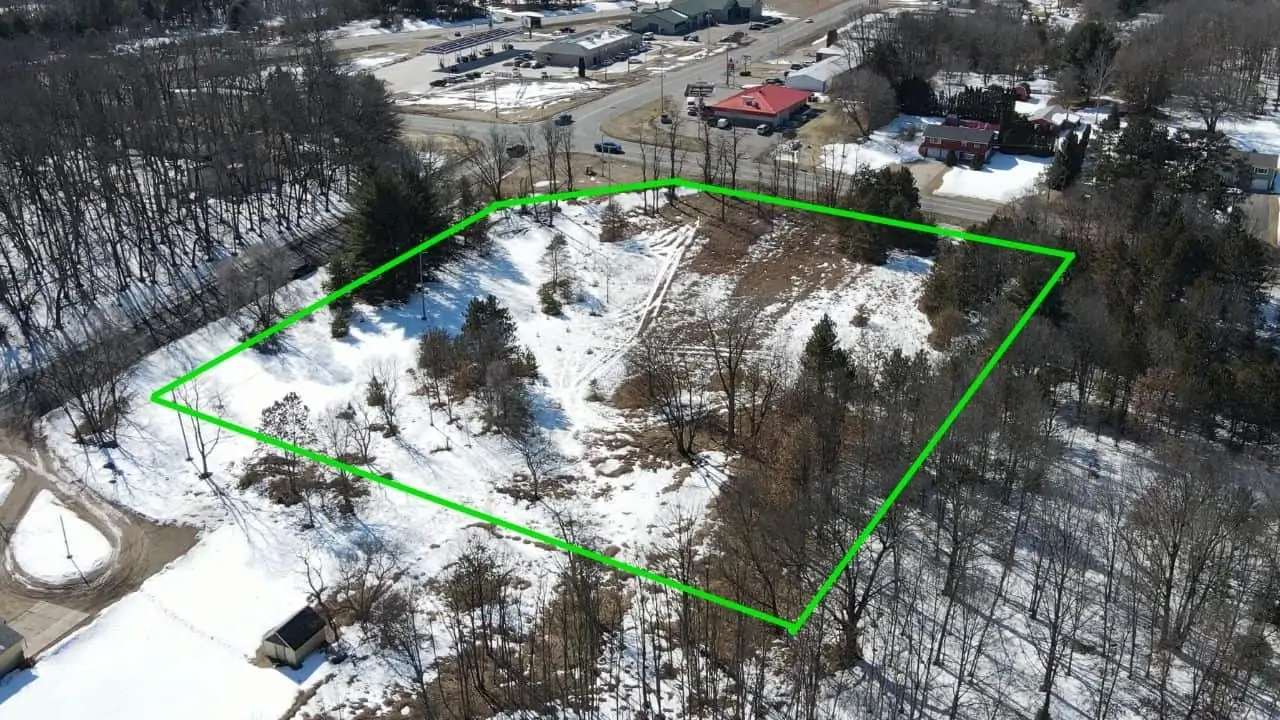
It was listed at $69,000 and located on a fairly busy intersection, just across the street from two gas stations.
This property was zoned residential, and all the other parcels were residential, too.
However, it was right on the edge of a commercial and residential district, which made it an ideal candidate for rezoning.
As a residential lot, even if I couldn't get it rezoned, $69,000 was a pretty decent price for a property of this size. I knew that if I could rezone it to commercial, it would be worth even more… but even if I couldn't, it wouldn't be difficult to subdivide it into 3 smaller parcels and sell it at a smaller profit, so I had a solid Plan B if Plan A didn't pan out.
Rezoning land was something I had always known about, but I had never done it before.
I'd always heard it could be a risky, slow, and frustrating process, so whenever the opportunity came up on past deals, I would quickly dismiss it with the assumption that it would be too hard.
However, as I started looking at this property through the lens of a self-storage developer, the idea of rezoning started to make sense.
After talking to the listing agent, he suggested I call the township office to get their opinions about rezoning this property, if it made sense to them, and what the process would entail.
After calling the township clerk, he offered no guarantees, but he also acknowledged that this property probably stood a good chance of getting rezoning approval if I pursued it (in other words, I wasn't crazy for thinking there was potential here).
My next calls were to a couple of civil engineers in the area to get their opinion on this property. I wanted to know if they thought rezoning made sense and what would be involved in developing this raw land into a fully functioning self-storage facility.
They echoed what the township clerk had said about there being “no guarantees,” but they both said the property had plenty of attributes that would make sense for commercial rezoning.
Taking the Risk (April 2021)
In my conversations with the local township about rezoning, they explained that the current property owner must appear before the planning and zoning committee to make their case.
One way to handle this situation would have been to sign an Option Agreement, giving me the right but not the obligation to buy this property for $69,000 from the owner if and when I could get the rezoning approved. This way, if the rezoning request wasn't approved, I wouldn't be stuck with a property I couldn't use for my intended purpose.
Another strategy would be to sign a purchase agreement with a long closing deadline (6-12 months out). The purchase agreement would also include the condition that I could walk away from the deal if I could not approve the rezoning. Again, this would have allowed me to leave the deal if I couldn't get the zoning straightened out.
However, the least complicated (but highest-risk) path was to buy the property outright and try to get it rezoned myself after I was the owner.
Normally, I'm not the type to take the highest-risk approach, but in this case, I knew I was buying a property that was easily worth its asking price. I also knew that if I failed to get it rezoned, I had a Plan B exit strategy.
So, on April 1, 2021, I paid $69,000 cash and bought the property free and clear. The annual property tax bill was $342.93, which wasn't too much of a financial burden as I was getting the zoning figured out. 🙂
The Rezoning Process (May – July 2021)
Immediately after closing, I applied for a zoning change with the township office.
The rezoning application was surprisingly simple. It three pages and it cost me $600 to get the wheels in motion.
After I submitted the paperwork and paid the initial fee, the township notified all the neighboring property owners within 300 feet of my property to notify them of my rezoning request. They were all invited to show up in person at the township on the date of my public hearing so they could protest the change if they wanted to.
In my conversations with other developers who had been through this rezoning process, I was told repeatedly that objections from the neighbors could present some HUGE problems in getting a zoning change approved.
A neighbor's objection doesn't necessarily mean it won't happen, but it only takes one neighbor to show up and throw a fit, and the whole process can get derailed and delayed.
One interesting insight came from one of my conversations with a local engineer. He told me that when neighbors object to a rezoning request, they will go through the five stages of grief.
- Denial
- Anger
- Bargaining
- Depression
- Acceptance
In most cases, they will eventually accept the reality of the situation, but not without causing a lot of noise and trouble.
If a neighbor isn't happy about your rezoning plans, the last thing you want is for them to show up at the public hearing and start their denial and anger in front of the zoning committee.
A much better approach is to contact the neighbors ahead of time and tell them what you're hoping to do, why you're trying to do this, and how it will have a positive impact on them and their property. If they have any issues, you want them to start processing those five stages of grief directly with you well in advance of the public hearing. This way, you can help address their concerns and help them get through each stage long before the zoning board is ready to make their decision.
I thought this was a great idea in theory, but even so, I was a little scared to knock on doors, talk face-to-face with these strangers, and deal with their wrath in person, especially during a pandemic.
As I thought more about how to handle this, I remembered a website called Cards In Motion. It's a Canadian-based company that sells video cards. When the recipient opens their card, they'll see a small device automatically playing a pre-made video.
Given my discomfort with meeting the neighbors face-to-face, I thought video cards would be a GREAT way to say exactly what I wanted to say, exactly how I wanted to say it, in a friendly, pre-made message that delivered good information and requested feedback.
I ordered ten cards from the company (normally, they require a minimum order of 50, but they made an exception for me), which cost me $825.21 (not cheap).
My cards had a 7-inch LCD screen in a white card so I could insert a short written message along with the video.
I'll show you what my video cards looked like below…
Maybe because of my brilliant video-making skills, or maybe I just got lucky, but the video cards worked beautifully!
Of the ten cards I sent out, I only got one response. It was from a lady who lived in the adjoining property north of mine. Here's the full conversation.
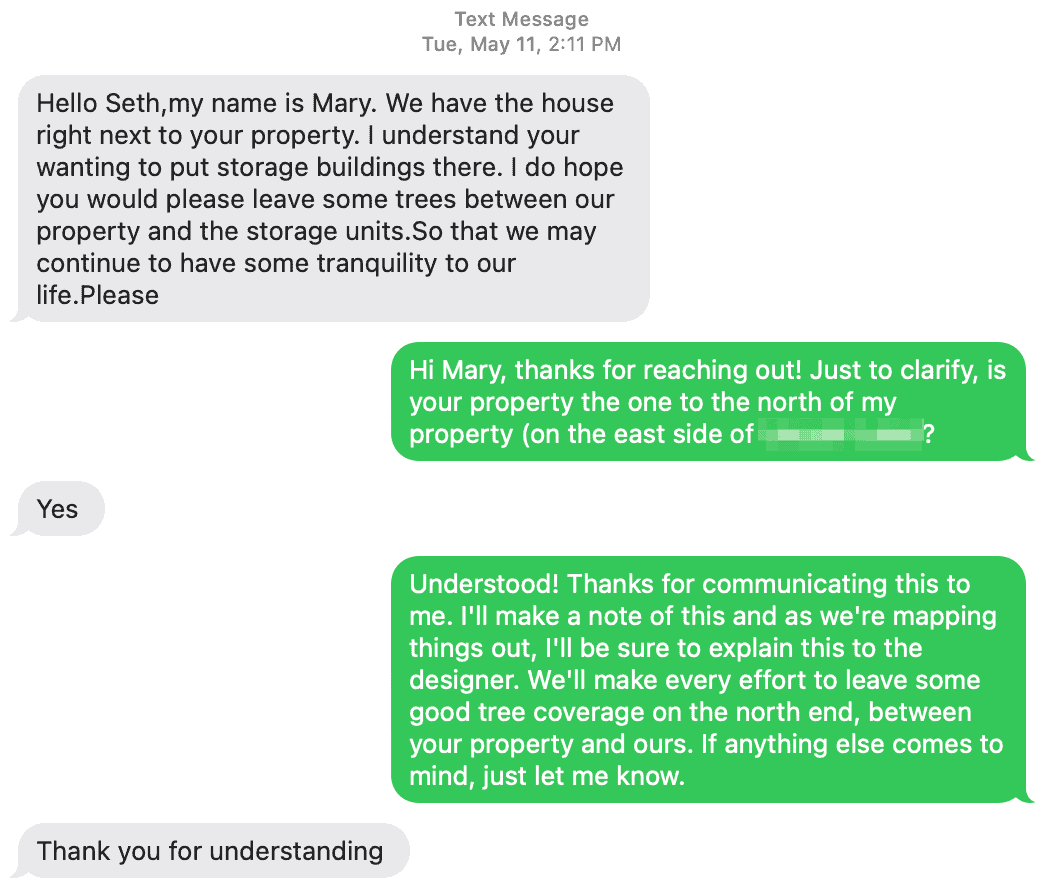
As you can see, it was a friendly exchange! If this was going to be the only neighbor response from my video cards, I was thrilled!
Zoning Commission Hearing
On June 15, I had my first meeting with the zoning commission. The purpose of this meeting was for the zoning commission to hear and see my high-level plans and ask any questions about my rezoning request.
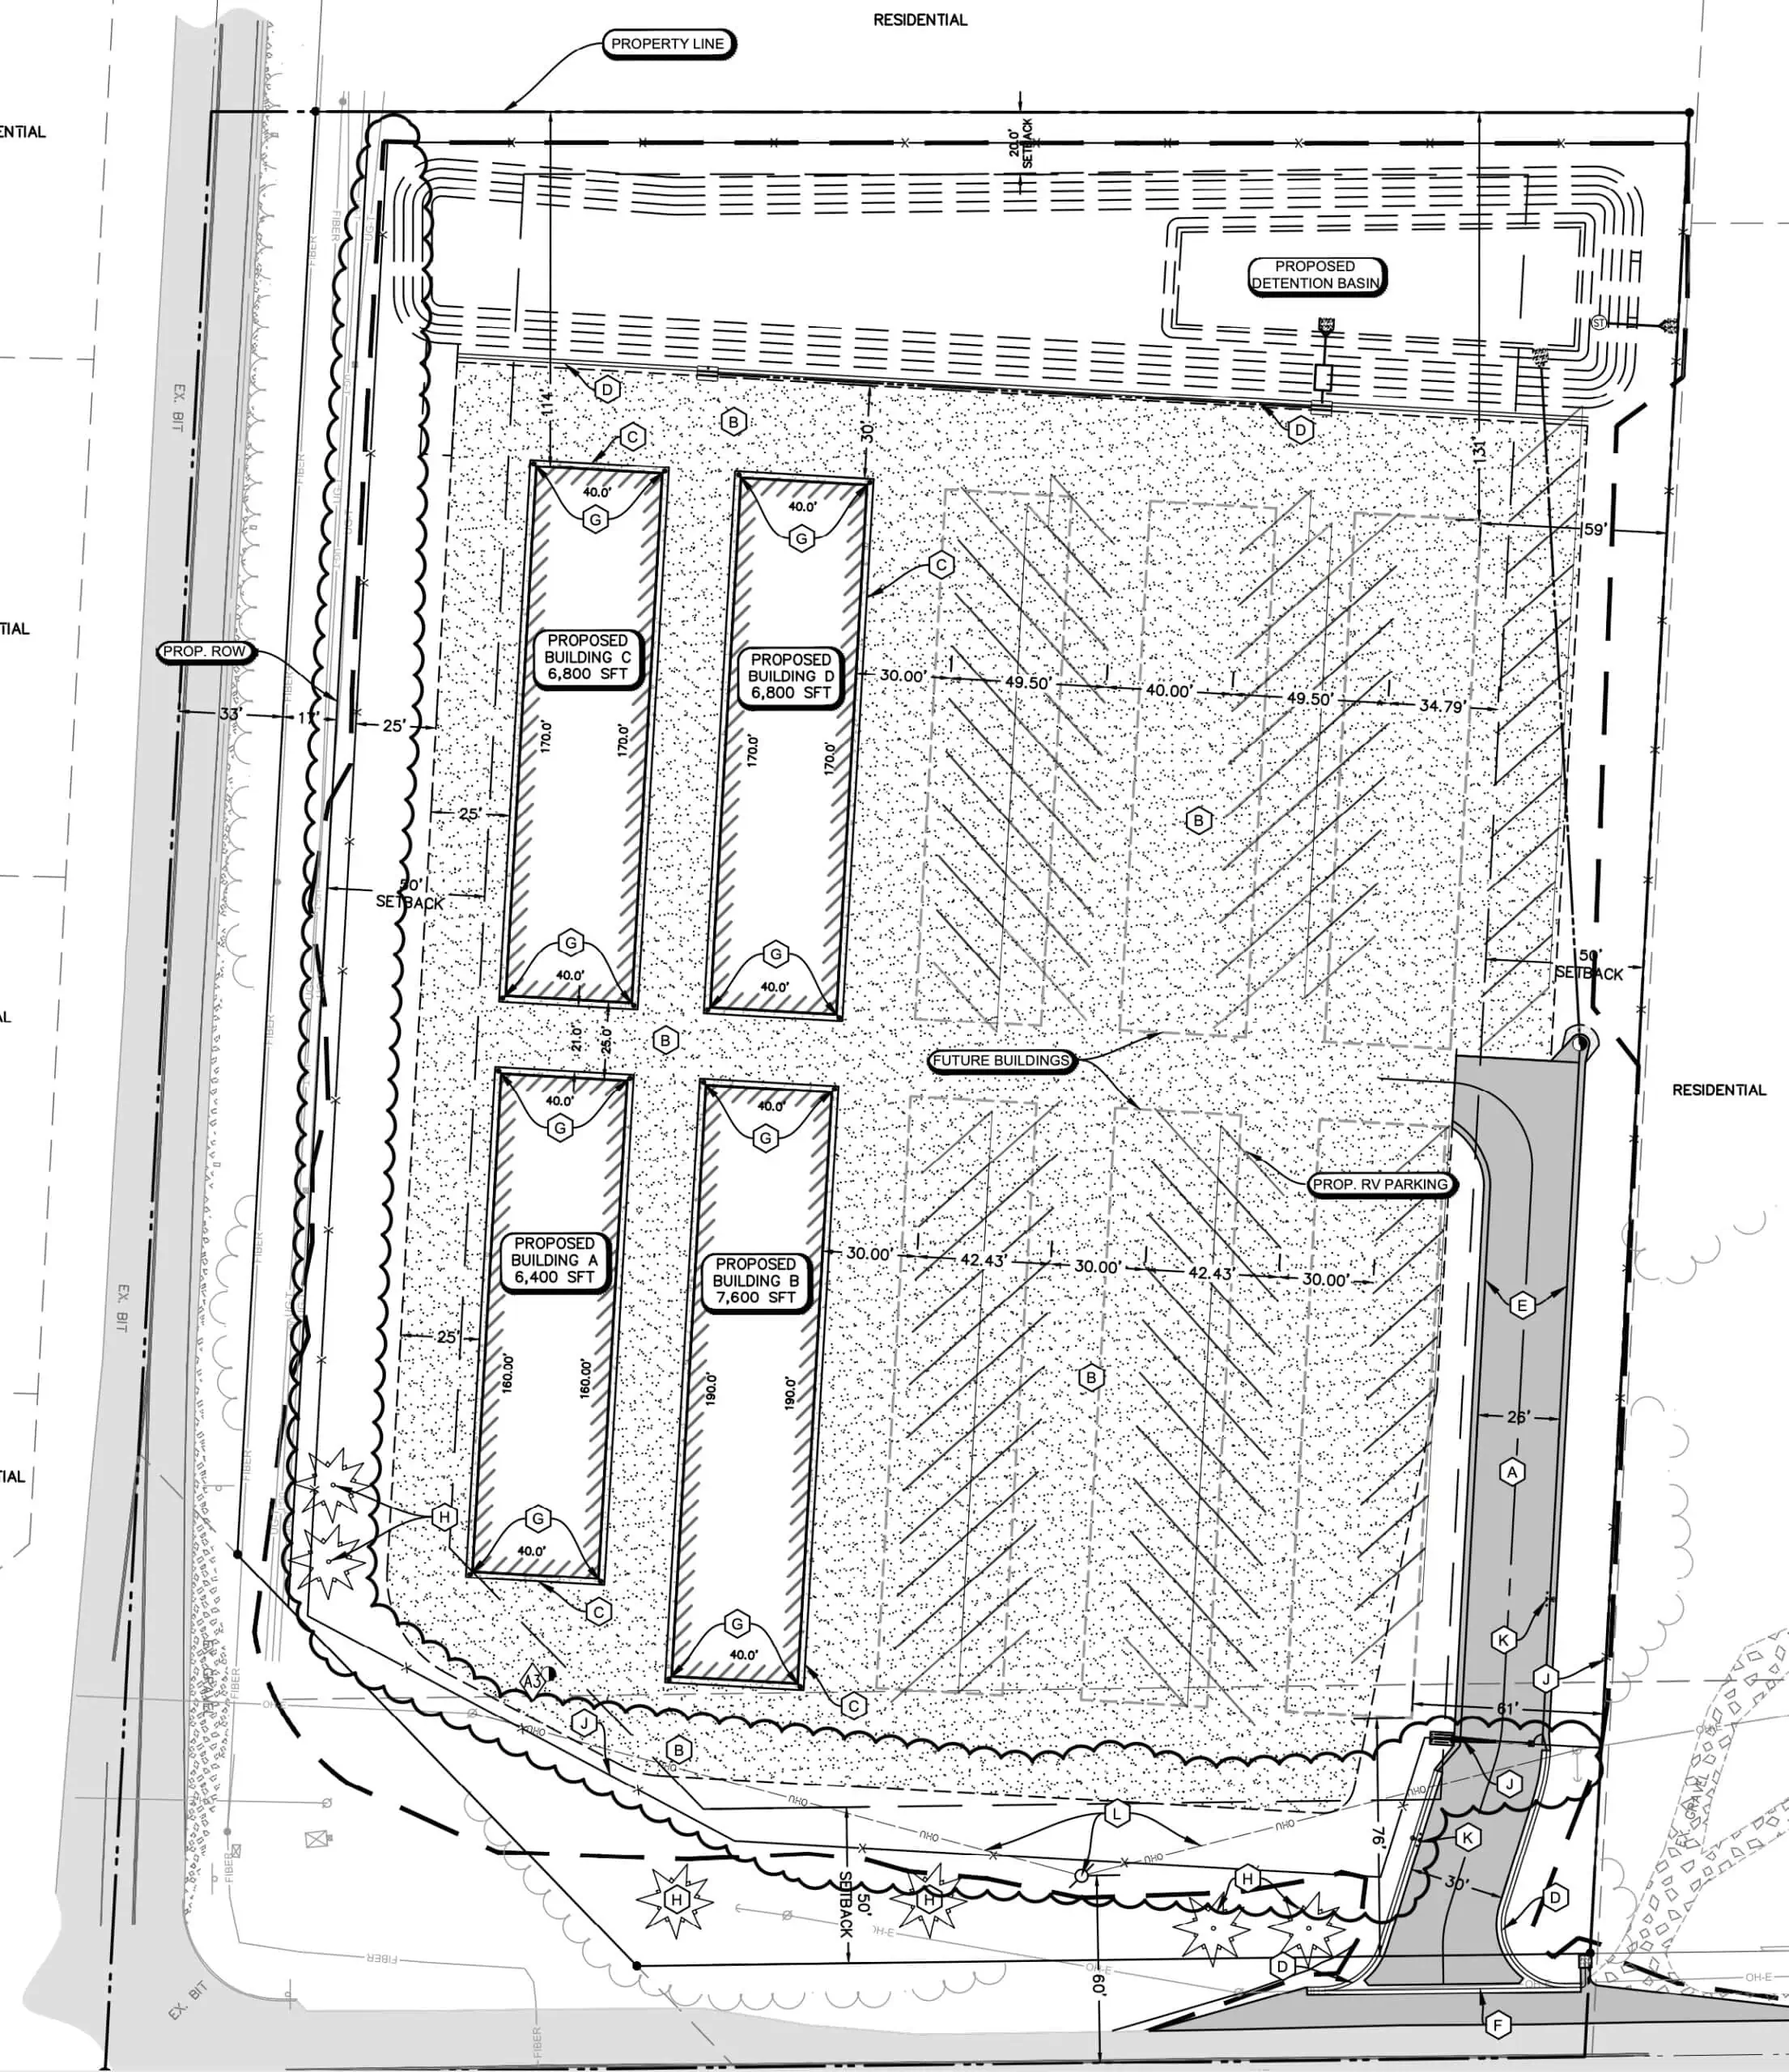
Prior to the meeting, I had my civil engineer put together a ‘conceptual site plan' to show what the facility might look like. This plan cost me $825 and it looked like this:
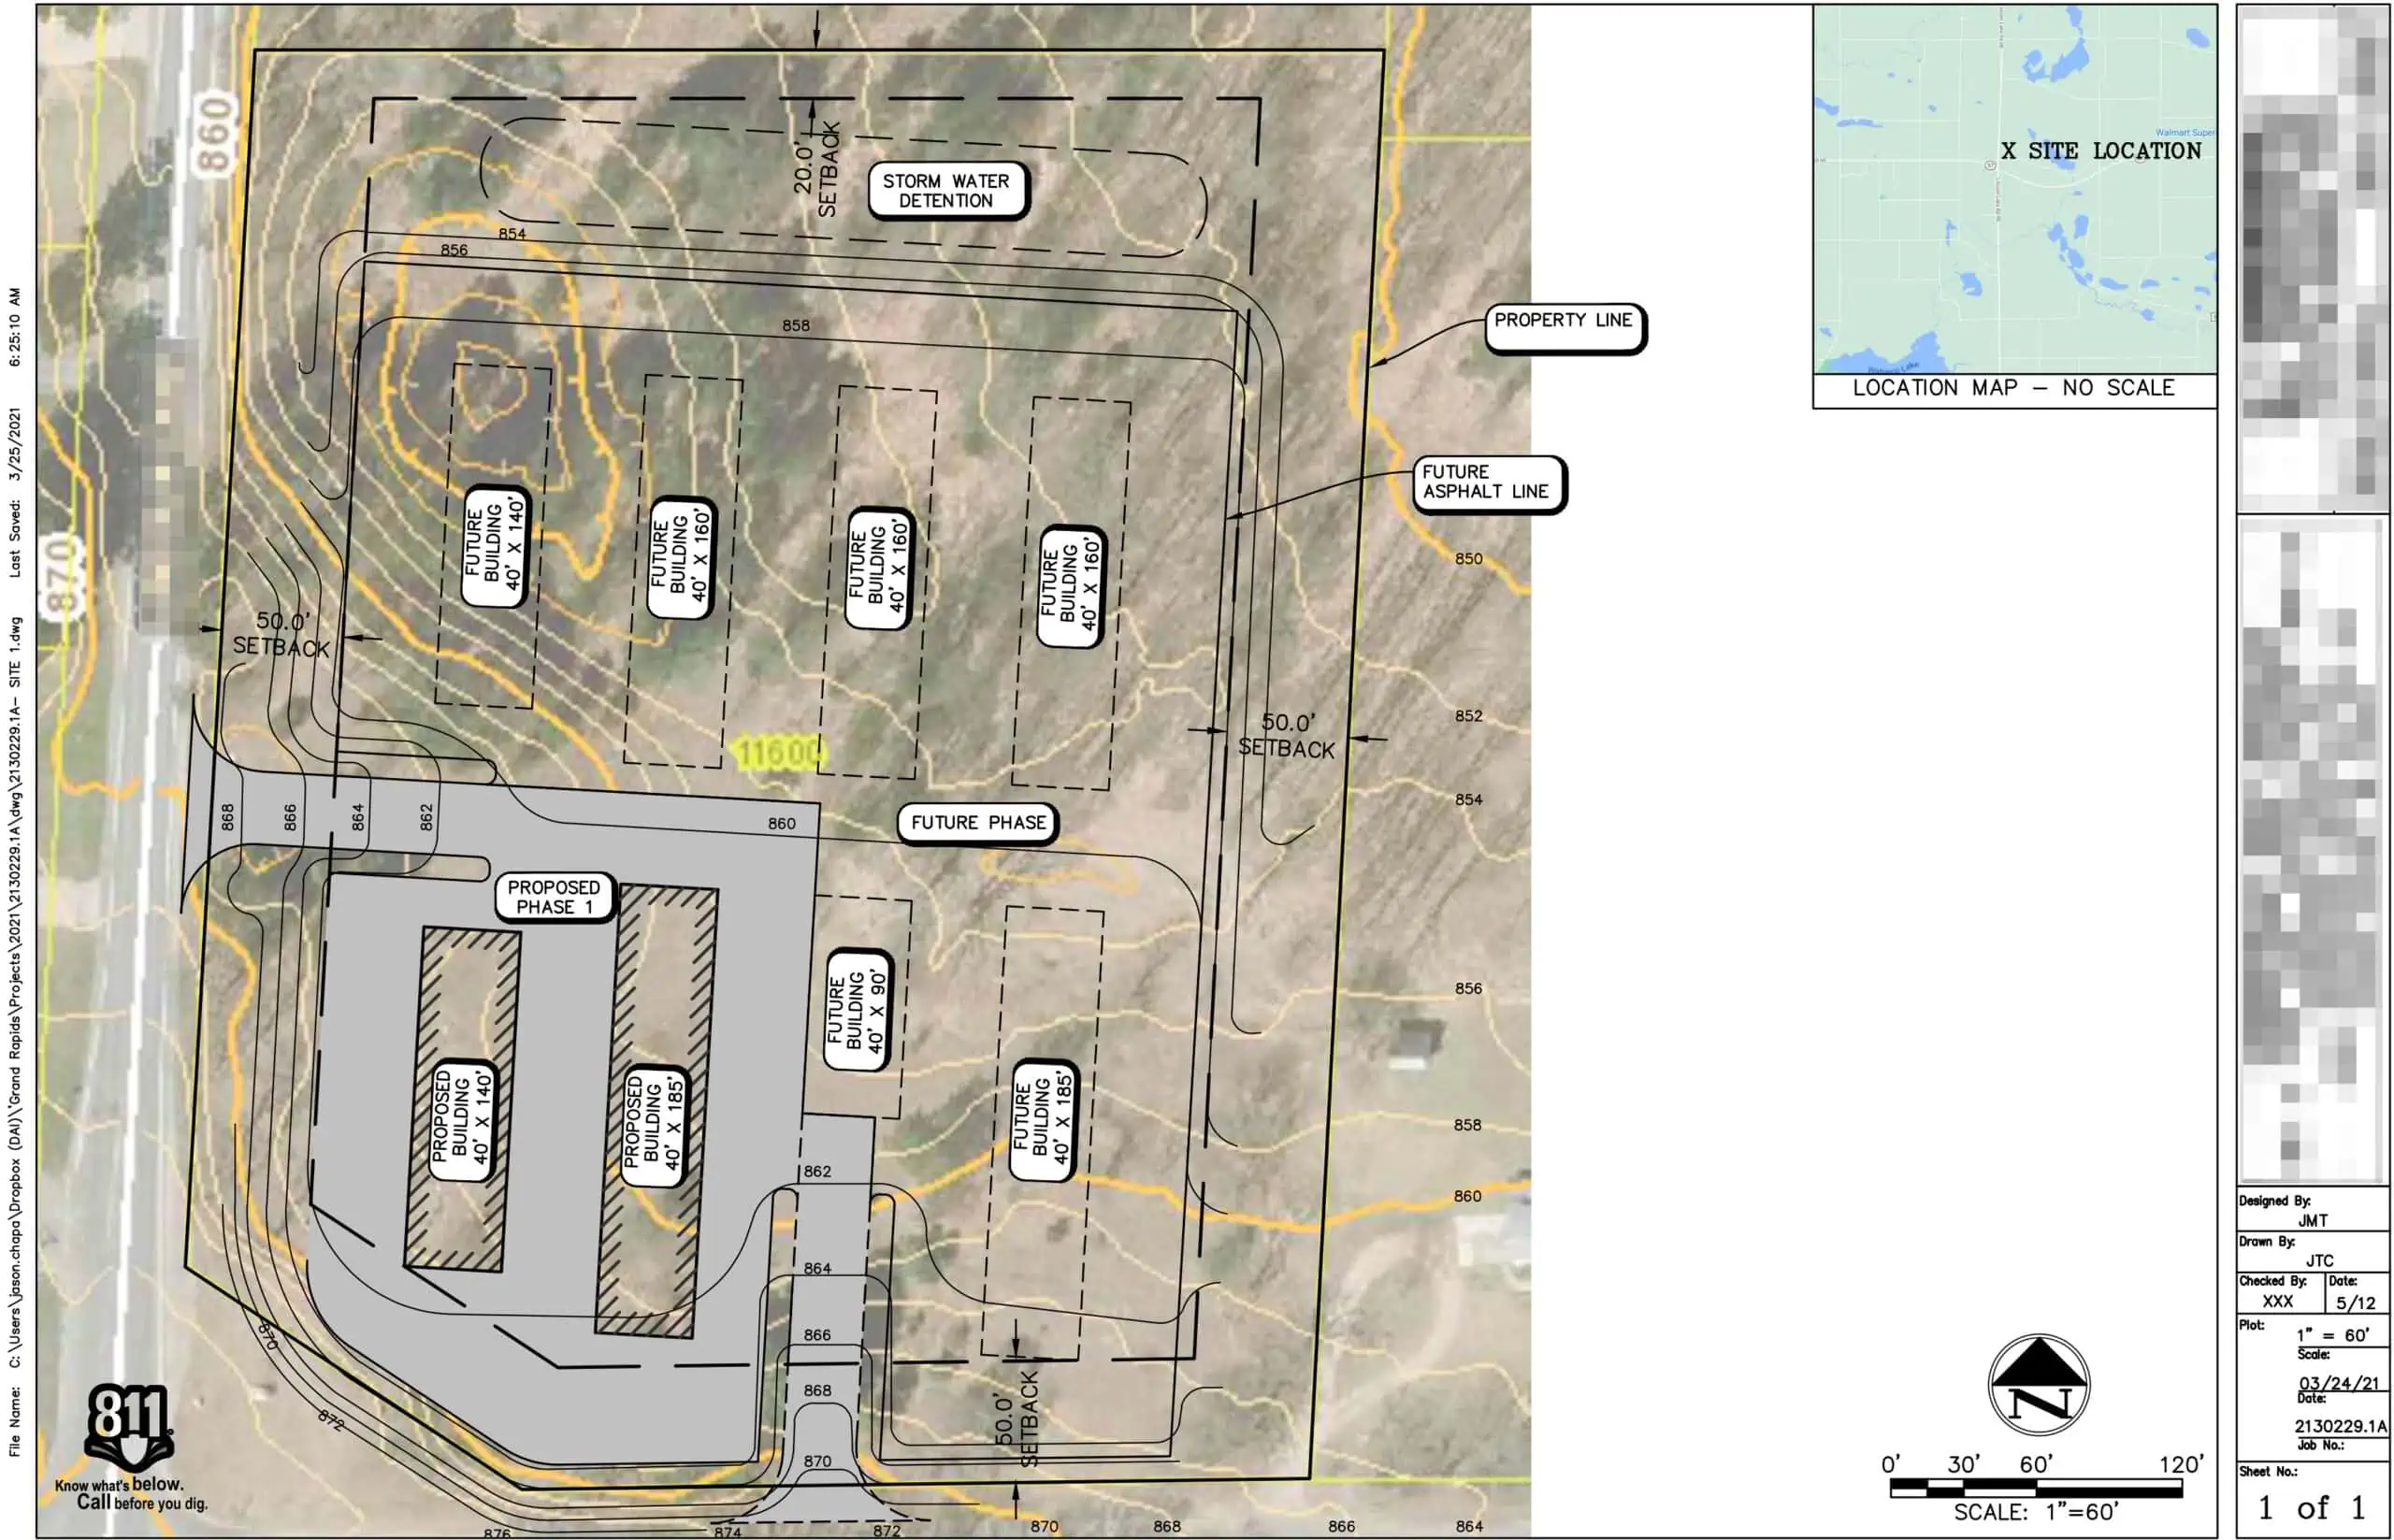
As you'll eventually see, the final designs looked very different from this. The objective of this drawing wasn't to show the final layout, but just a vague idea of what I had in mind for the site.
Luckily, the meeting went smoothly! I explained my plans and why I thought it was good for the area (namely, it would be a low-impact property that wouldn't bring a lot of new traffic to the neighborhood). I also explained why it was good for the township (because it would increase their tax revenue and add a beautiful new facility to a busy corner with an empty lot).
After a few softball questions and answers, the zoning committee gave it their thumbs up!
Further Due Diligence
Even though the zoning commission said “yes” to my request on June 15, the zoning change hadn't been approved yet.
The zoning commission was recommending their approval to the zoning board. The zoning board (which consisted of mostly the same people as the zoning commission) wouldn't meet until the following month, on July 13. So, I had to sit around for a month and wait.
Luckily, once the zoning commission says “yes” to this kind of request, it's highly unlikely the zoning board will overturn this recommendation and say “no” the following month.
Up until June 15, I had been advised by nearly everyone that I should not spend any more money on surveys, soil testing, or other expensive investigations until I knew the property could be rezoned the way I needed it to be (because if you can't use a property for your intended purpose, it makes no sense to spend thousands on more due diligence until the usability is finalized).
I struggled with this because, when you're developing a property like this, you can spend A LOT of money verifying that the property is usable before you start moving dirt.
It's also possible to spend a small fortune on plans, tests, evaluations, and other professional services just to be told “no” by the township or run up against some other show-stopping obstacle in your due diligence process.
Now that the zoning commission had given their recommendation, I had much greater certainty that this zoning change would work, and the next big step would be the site plan review, where the township would review a REAL, final site plan, where we would draw out exactly where the buildings would sit, with 100% accuracy. This next step would be much more involved and cost about $12,000.
For my civil engineer to even begin working on the site plan, she needed a topographic survey (which would cost me $2,500) and a geotechnical investigation (which would cost me $5,890)… but even my civil engineer didn't recommend I pay for these things until I knew the zoning change was approved.
So, after the zoning commission had given me their “thumbs up” on June 15 and I had 90% certainty it would go through, I felt comfortable enough to start paying for these assessments, so I ordered the topo survey and geotechnical investigation, and they were both complete before the zoning board hearing on July 13.
Zoning Board Hearing
On July 13, I showed up and sat in the middle of the board room again, surrounded by most of the same people from the month prior.
After fielding a few easy questions:
- “Will you have to bring much dirt onto the property to fill in the holes?”
- “Are you going to put up a fence around it?”
- “How big will these units be?”
The board officially approved my rezoning request under one condition: since this property was at an intersection with one busy road and one less busy road, I was only allowed to have a single entrance to the facility on the road with the least traffic.
This was no problem, and we went ahead and removed one of the two entrances to the facility.
Site Plan Review (September 2021)
Getting the commercial zoning approved was a BIG first victory. This was a huge piece of uncertainty that had scared off many other investors from buying this property in the first place. Now that this issue was resolved, it was a big relief.
But I couldn't party too hard yet because the work had only just begun.
The next stage was putting together a site plan, which would be significantly more expensive and time-consuming.
It took my civil engineer about a month and a half to prepare the site plan and submit it to the township for review. On September 2, we submitted it, and the site plan review meeting was set to happen on September 21.
When September 21 finally rolled around, our meeting with the township went smoothly. My civil engineer was kind enough to show up at the meeting to help answer any questions that came up from the committee.
Because my engineer did such a good job, there weren't any big issues to hash out, but the committee did have a few questions that I had no idea how to answer (what type of gravel I was planning to use when I was planning to pull soil erosion permits, etc.). They weren't huge issues in and of themselves, but if my engineer hadn't been there to quickly answer them, I wouldn't have had a good response for them.
Big Lesson: It's very helpful to have the civil engineer at the meeting or at least on-call to answer any questions that come up.
Feasibility Study
Normally, the best time to order a feasibility study is BEFORE you dive head-first into a project and start spending piles of cash, assuming it will work out.
I had done my version of a feasibility study before buying the property (and as a former banker, I had some good ideas about what to look at), but it wasn't until this point, on September 8, that I ordered a feasibility study from Stephan Ross at Cutting Edge Self Storage. This study normally costs $7,000, but I got a 10% discount because I was referred to Cutting Edge my consultants at S3 Partners.
This turned out to be a VERY enlightening milestone because it confirmed a lot of my original research (how many competitors were within the area, what their pricing was, the need for new storage space in the area, etc.) and also gave me a lot of new information about what it would cost to build a facility like what I had in mind, and even some other considerations I hadn't thought of yet.
When I received the report on September 25, it was over a hundred pages and FULL of useful information.
I was surprised to see that, according to their projections, the project would break even in less than a year.
I had always heard that new facilities like this could take up to a couple of years to reach this milestone, but as the self-storage market was red hot in mid-2021, the feasibility study confirmed that there was a need for this facility in the area, which was very good information to have and it helped me move forward with confidence.
Project Budget
With the feasibility study complete, we had a lot of information on hand to start preparing a preliminary budget for this new facility.
I had no idea how to estimate these construction costs, so I leaned heavily on the consultants and also my general contractor to figure out approximately what my construction budget would need to be.
Initially, my consultants' budget came in higher than I wanted it to, at around $2,276,405. Considering what my cash flow would be (based on the feasibility study and pro forma), a project this expensive would eat too much into my revenue.
I told them that if the project was going to work, the price had to be lower, so they revisited and started slashing costs anywhere they could (less money spent on landscaping, fencing, electrical service, less expensive doors, and buildings, etc.) and we came up with a revised, “lean” budget number of $1,701,728.
In reality, almost every new construction project exceeds estimates and moves slower than expected, so we knew that the final number would likely fall somewhere between $1,701,728 and $2,276,405. I hoped it would land as close as possible to $2,000,000, so this was the number I took to the bank.
Bank Financing (October 2021)
At the beginning of October, I started looking for a commercial lender.
Since I had worked in the commercial banking world for nine years (from 2007 to 2016), I knew a lot of commercial lenders in my market, but I had never worked with any of them as a borrower.
I knew from the banking world that when you're borrowing money, it's mostly a commodity.
It's not so much a matter of what bank or credit union you borrow from as much as what rate and terms you can get, how easy and fast the process will be, and the quality of your relationship with the banker you're working with. I decided to call up one of my friends in the industry to get the ball rolling.
After a few conversations, we discussed some possible ways to finance this deal.
- SBA 7(a) Loan: With this type of loan, the bank would finance $1,600,00 (or 20%) of the $2 million project, and I would have to contribute the other $400,000. Of the $1.6 million loan amount, the SBA would give the bank a 75% guarantee (i.e., If I ever defaulted on the loan, SBA would reimburse the bank for 75% of their loan balance). This kind of guarantee requires the bank and borrower to jump through some extra hoops to get SBA approval, but it puts the bank in a much safer position, especially considering my business is essentially a startup with no proven track record.
- SBA 504 Loan: With this type of loan, the bank extends an “interim loan” of 90% of the project cost. In my case, the bank would finance $1,800,000, and I would contribute $200,000. With a 504 loan, instead of offering a 75% guarantee, SBA would come in and pay off the bank by 40%, bringing their loan balance down to $1,000,000, which leaves the bank at 50% LTV. Meanwhile, I would have two loans to pay off over 20 years, one for $1,000,000 to the bank and another for $800,000 to the SBA. Again, this puts the bank in a much safer position and makes a lot of sense for startup businesses. It also gives the borrower a much lower down payment and a fixed rate on the SBA loan. But, again, it requires the bank and borrower to jump through many extra hoops.
- Conventional Loan: This is where the bank finances 75% of the total project cost, and I would put down 25%, possibly 30%. I would then have one loan to pay off over the next 20 years, and the interest rate would reset/adjust every 5 – 7 years. The benefit of this loan is it's much faster and simpler, with one approval process. The downside is that I would have to put down a lot more money, and the rate wouldn't be fixed.
The loan(s) would amortize over 20 years with each option, but the interest rate would adjust every 5 – 7 years. With the SBA 504 loan, the interest rate on the 40% / $800,000 loan would be fixed for the entire 20 years (a nice benefit with that loan program), but the bank loan would be adjustable.
When financing something like a new self-storage facility (particularly one owned and operated by someone like myself with no prior experience in self-storage), SBA loans are a popular choice and usually a requirement… because a new business presents some obvious risks for the lender. I was surprised that the bank was willing to give me a conventional option at all.
Waiting for the Bank (October 2021 – February 2022)
Waiting for the bank to approve this loan was the first real, frustrating experience because it took them a long time. I wasn't necessarily in a big hurry to get it done, but by this point in the process, I had gotten several other parties involved with the deal, and I didn't want to keep them waiting.
After hearing it would be approved on December 8, the date was moved to December 22.
December 22 came and went; I was then told it would be approved on January 5, maybe January 12 at the latest.
Fast forward to February 16, and I was still waiting.
Then, FINALLY, it was approved on February 24.
The final product was exactly what I needed, but after being pushed off and feeling ignored for two months, I had a bad taste in my mouth from the experience (and mind you, the bank and I hadn't even started working together yet).
Even though I was annoyed and skeptical about how responsive this bank would be to my needs, I was willing to continue working with them on the project since we had gotten this far.
Finding a New Bank (An Unexpected Discovery)
On February 25 (the day after getting the bank's approval), I got a random phone call from the realtor who had sold me the land in early 2021. He was checking in to see how the project was going.
As we talked for about 20 minutes and I explained where things were with the financing, he mentioned a commercial banker he knew who could do 20-year fixed interest rates with conventional loans.
In the commercial banking world, a 20-year fixed interest rate is almost unheard of. In my decade working in commercial banking, I had never heard of any bank offering this… and I figured he must be mistaken. Nevertheless, he gave me the name and phone number of the banker he knew, and he connected us.
Later that day, I got a call from the banker, who confirmed it was possible! So, on a whim, I decided it wouldn't hurt to get their approval, so I sent this new banker all the same information I had sent to the original bank, and they started getting the deal approved.
Finalizing Construction Plans and Engineering (March-May 2022)
Now that at least one bank would extend financing to me, I felt it was safe to pull the trigger on finalizing our construction plans.
The cost of doing this was about $51K, so I wanted to wait until I knew the bank was on board. Here is the cost breakdown:
- $15,000 for the self-storage consultants
- $21,000 for architectural engineering
- $6,000 for structural engineering
- $4,400 for electrical engineering
- $5,000 for civil engineering
This process took a surprisingly long time, with many gyrations and back-and-forth discussions between all parties involved. These calls were important because each person's actions would impact the other, so each person needed to understand what the other was doing.
In this process, we ended up deciding a lot of important things.
- We moved the driveway's location, which saved us over $200K in excavation costs (this lot was bowl-shaped, and the driveway location had a BIG impact on how much fill material we needed to bring on-site).
- We determined where the automatic gate would be, what kind of gate it would be, what kind of fencing material we would use, and where it would go.
- We decided where the lighting would be placed throughout the facility.
- The civil engineer determined how the lot would slope and drain into the retention pond on the north end of the property.
- The architectural engineer determined the precise layout of the RV/boat storage area and how many spots of each size would fit within the space we had.
- The electrical engineer determined where the transformer would be placed. We also decided to move two of the power poles because of how excavation would impact them and where the parking spaces would be. This process added some unnecessary delays because we, as a team, didn't do a great job of communicating with the power company about where the poles would go.
This was another important step, and I realized several times how important it is to have people on your team who know how to think critically and spot opportunities for improvement.
The Final Site Plan
Everything from the driveway's placement to each parking spot's location presented some challenges around how much storage space we would have, and not everyone on the team was great at thinking through the best ways to lay things out.
There were several moments when I realized I needed to pay close attention and catch things myself. Even though every other person on the team was getting paid a lot of money to be the ‘expert,' I couldn't count on them to see every issue and handle everything perfectly.
This was the second time during this journey that I started feeling frustrated. The process felt bloated, with poor communication from several sides. Even though we were having large group calls every week, it felt cumbersome to have all these meetings via Zoom rather than meeting once or twice in person at the site.
Certain team members wouldn't follow instructions, would miss deadlines, and easy things that could've been caught and fixed early on didn't get caught or addressed until weeks (and, in some cases, months) later than they should have been.
Even more frustrating was that I didn't know who to hold accountable. Was it my job to see all the issues and catch them? Or my consultants? Or my general contractor? Or should each individual on the team supposed to catch each other?
Even today, I still don't know who was responsible for which problems.
Big Lesson: If I could do it all over again, I would start by finding a great General Contractor and then let THEM decide which civil, structural, architectural, and electrical engineers to use. They likely already have these team members established, and cohesion will happen more naturally. This way, if there are hiccups or delays, I can look to one person (the General Contractor) and hold them accountable. Since I was bringing several disconnected parties together, it was difficult to make personalities mesh and ensure proper communication.
Appraisal Issues & Delays (April 2022)
Around the time my team was making progress toward the site plan, in early May 2022, I encountered one of my first big “problems” in this process.
After my new bank had approved my loan, there were two big boxes that needed to be checked before I could get the money and start spending it.
- General Contractor's Preliminary Sworn Statement (more on that below).
- As-Complete Appraisal.
With an As-Complete appraisal, a commercial appraiser needs to look at the construction plans and budget and use their best guess to determine what they think the property will be worth once construction is complete.
The appraiser also formulates an As-Stabilized value, which is different than the As-Complete value.
As-Compete is what they think the property will be worth on the day of completion. In other words, they only look at the value of the land and structures as though they are empty and not generating any revenue (using only the cost approach).
As-Stabilized is what the property will be worth when the units are full and the facility is fully operational (using the income approach).
The As-Stabilized value came out to $2,075,000, and the As-Complete value came out to $1,830,000.
Unfortunately, the bank could only use the lower As-Complete value as their total project cost, meaning they could only lend 80% of this number, not the higher $2,200,000 estimate we originally planned for.
Unfortunately, the appraiser was using incomplete numbers for his valuation.
To finish the appraisal in time to close and fixed on my original quoted rate of 4.83%, this appraisal needed to be finished, and we needed to close no later than June 8. This was 90 days from the date when I was originally quoted this rate in the bank's commitment letter… if we didn't close by then, the rates would reset to much higher numbers since rates had already risen substantially since March 8, 2022 (this was just before the war in Ukraine started and the Fed started raising rates).
We didn't have time to wait for my engineering team to finish the job so my contractor could finish his sworn statement. We needed to get this appraisal done now! So, the appraiser said he could accept a construction budget from my contractor on his letterhead, so that's what we did.
The problem was my contractor didn't have all the information when he put this together, and even though the new, higher costs came in after the fact… the appraiser wasn't able to see this. He had to work with older, incomplete information, which is why the appraised value came out so much lower.
As a result of this lower appraised value, I would have to come up with an additional $160K(ish) out of pocket if we wanted to proceed.
Luckily, I had the cash, so this unfortunate appraisal issue wasn't a deal-killer for the project just yet.
Loan Closing Day (May 2022)
On May 26, 2022, I met with my banker, and we signed closing documents.
Since we were still waiting for the plans to be finalized and for the township and road commission to issue their approvals, I still wasn't 100% certain this project was ready to proceed as of this date, but if I wanted to lock in for eight years at 4.83%, I didn't have much more time to wait.
Because things still weren't 100% ready to go, I made sure to check with my banker to see,
“What happens if I sign these documents and then decide we aren't going to do this project? Will there be some kind of penalty if I don't move forward and don't end up borrowing?”
My banker confirmed that there would not be a penalty if we canceled the project, so with that assurance, there wasn't any drawback to proceeding with the closing. They wouldn't even advance any money until my contractor issued his preliminary sworn statement, which still hadn't happened at this point.
Preliminary Sworn Statement and More Delays (June – July 2022)
As mentioned above, one of the last big hoops we had to jump through before I could start using the loan proceeds was from my general contractor. He needed to put together a preliminary sworn statement, which is a detailed, precisely measured outline of the construction costs, with his signature on it (so, he can't just make these numbers up; he needs to be very confident about what he's quoting).
These aren't just guesses about how much construction will cost (which is what we did at the very beginning of the project). These numbers are formulated by reviewing the FINAL construction drawings and getting hard quotes from each subcontractor.
This is important because the bank needs to know that we aren't just guessing how much money will be needed. We have a high level of certainty about what everything will cost (the “measure twice, cut once” approach).
Unfortunately, my contractor couldn't do this until everything was complete from the planning end (all the engineers finished everything, and the township and county road commission had approved everything).
One of the many speedbumps in the planning stage was two of this property's three existing power poles. One was in the way of a drive lane for the facility's boat and RV parking area. The excavation would impact the other one (we would be shaving about 10 feet of soil from around it, so it needed to be reset or moved entirely.
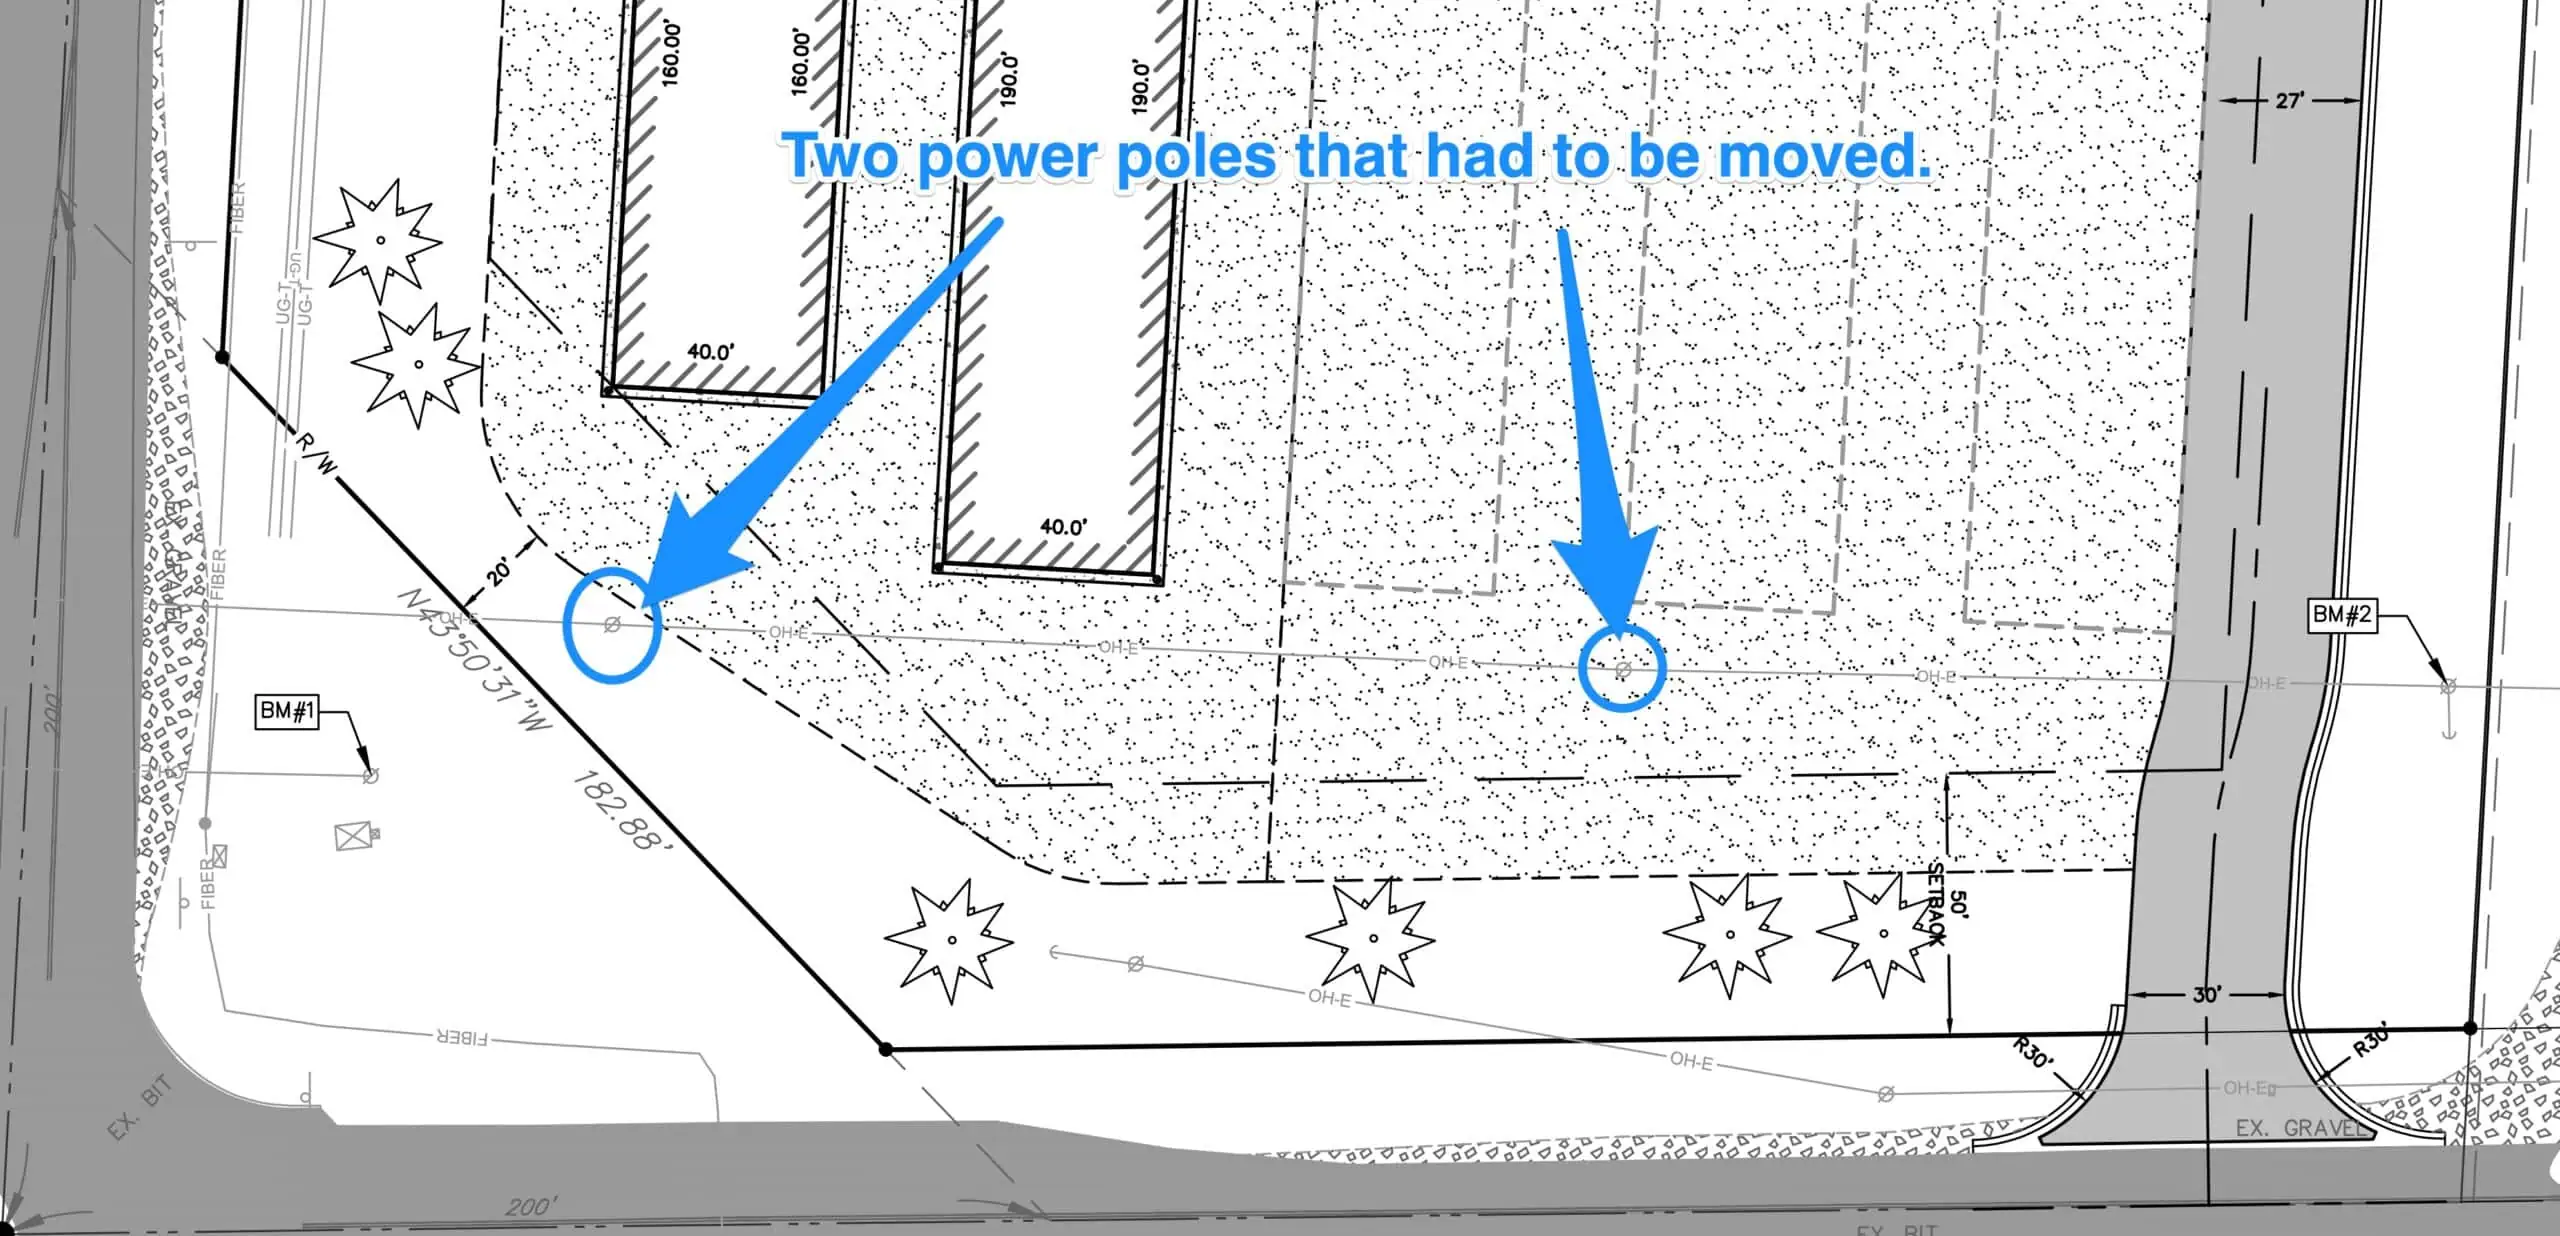
It would cost $12,000 for the local utility company to move these, and it required their design and approval, adding another layer of complications, costs, and delays to the planning and design process.
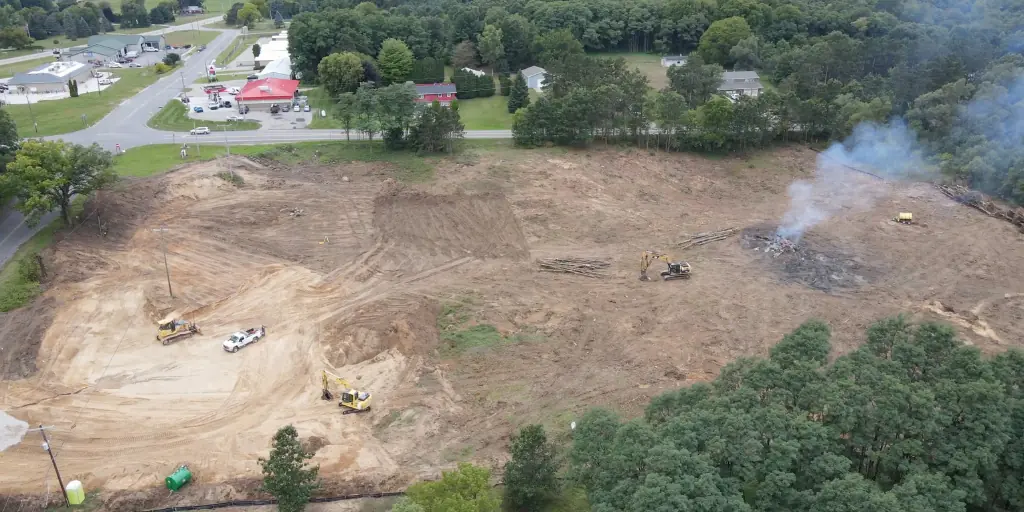
Step 1: Tree Removal (August 2022)
In late August, things finally started moving. Our first step was to remove all the trees from the lot.
Ideally, I would've loved for a sawmill to harvest most of these trees, but this property wasn't big enough, and the trees weren't valuable or mature enough to extract much value, so I couldn't make any money back by harvesting the timber.
I called a couple of local sawmills to see if they wanted to take any of this timber for FREE. One of them visited the property in late 2021 and told me that with mostly red pines and small oaks, there wasn't enough usable timber to justify the cost of time and fuel to send a crew out.
So, we went with a “cut and burn” approach instead.
The process took about three weeks from start to finish.
Luckily, I had great communication with the neighbors to the north. They didn't want to lose all the trees, but they understood what we had to do and kept a good dialogue about their concerns, and I did everything I could to give them what they asked for.
We left 10 feet of trees on the north end of the property, and I agreed to install a privacy fence between our lots so they wouldn't ever see headlights from our facility shining at their house.
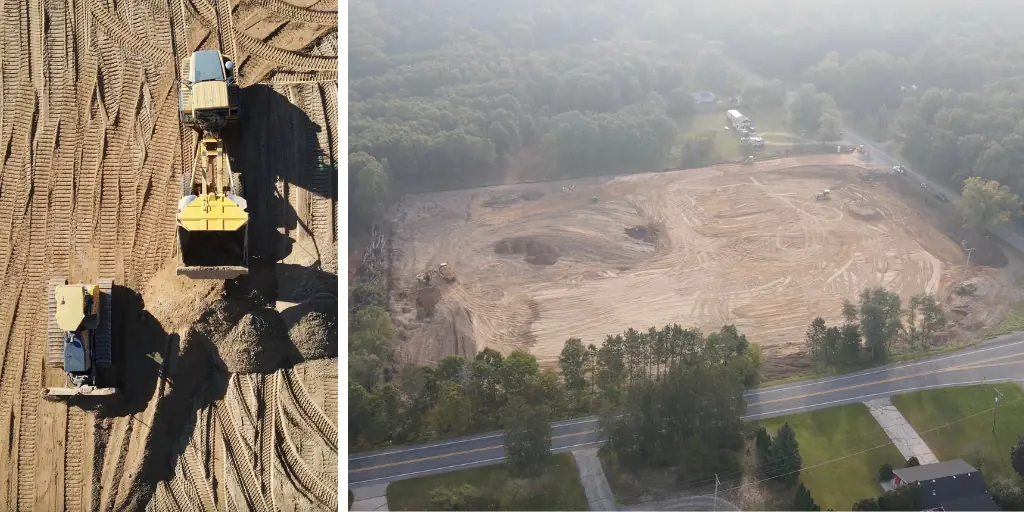
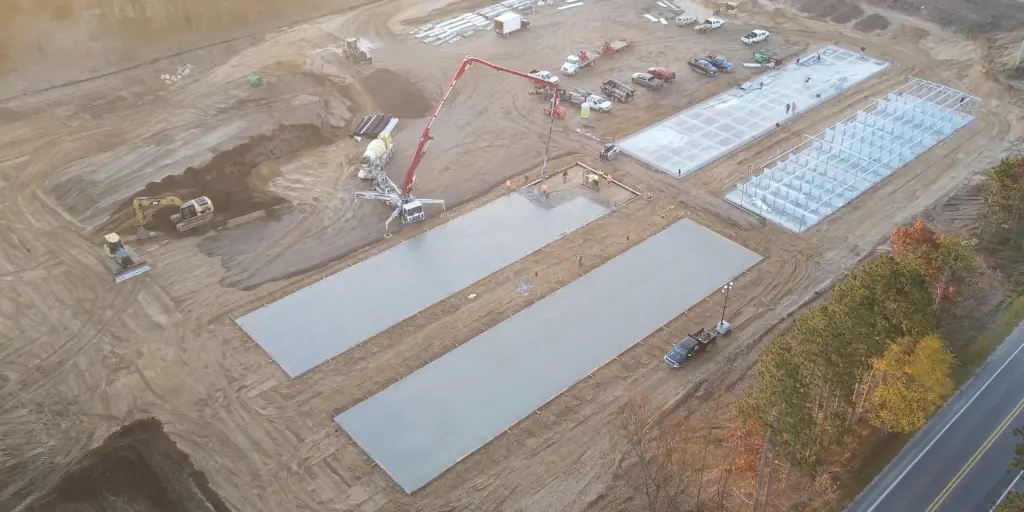
Step 2: Excavation (September 2022)
Excavation on this property was a huge job because the raw land had quite a steep slope along the southwest corner, which required 15,000 cubic yards of fill.
Originally, we had the entrance plotted in the center of the southern end of the parcel, but by moving this driveway to the flatter southeastern corner, we could bring in a lot less fill material, which saved us a lot of money.
Overall, the basin-shaped topography still required extensive excavation and land shaping. Fortunately, the sandy soil was ideal for drainage.
Work started in September and continued for two months to carve out a retention pond and achieve proper grading.
An old phone line in the utility easement that couldn't be removed was an eyesore. The tree growing around it had to be partially cut, leaving the wire intact. AT&T charged $9,000 to remove their inactive landline. Contingencies covered unknowns like this.
Two power poles were scheduled to be moved from obstructing future drive lanes and excavation areas. The utility company wouldn't relocate them until the buildings were up, so excavators worked around them for the time being.
Rather than trucking all soil away, we built a berm on the north border as a visual barrier buffer where neighbors had requested one. This also helped us dispose of some excess soil without trucking it away.
Step 3: Foundations (November 2022)
Watching the foundations get poured for this self-storage facility was a surprisingly interesting step because I had never actually seen it done before, and I never realized what a group effort it was and how seemingly small design changes can have such a big impact on the price and time it takes to get the job done.

Forms were constructed for 27,600 sq ft of 5” thick concrete slabs with 12-inch footings. This was done over two days for the four buildings, and there were challenges with material shortages and unpredictable Michigan weather.
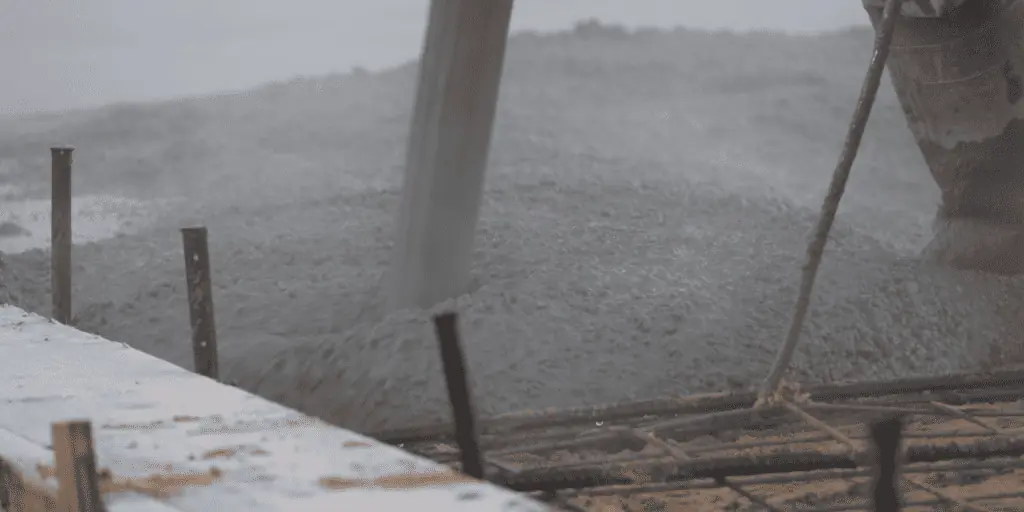
The concrete incorporated steel grids for strength that had to be positioned correctly. Laser guides ensured proper grading and drainage. An extra foundation perimeter was later added to secure steel bollards that protect building corners.
The process required coordination between the 26 trucks and dozens of on-site workers. It demonstrated how many people it takes to construct something precise and durable like this.
The slight slope of the site enabled a consistent 1% grade on the slabs, saving on steps between foundations. Out-of-state engineers initially proposed a 4’ deep insulated stem wall foundation. However, my general contractor recognized that the unheated buildings didn’t need that, so they switched to 12” monolithic slabs without insulation, saving us about $300k.
Overall, I learned the importance of getting local professional opinions when construction norms differ by region. This can help identify a lot of potential mistakes with overspending on things that just aren't necessary.
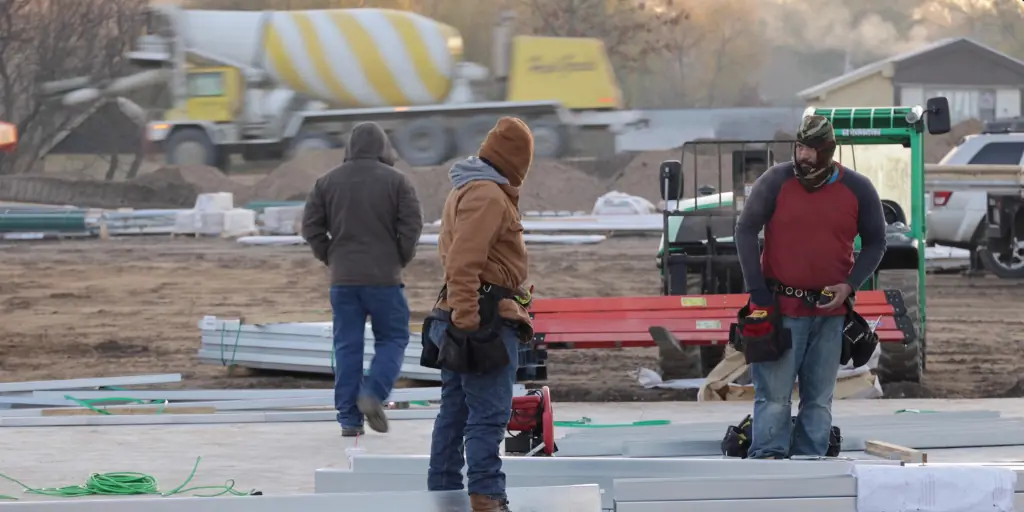
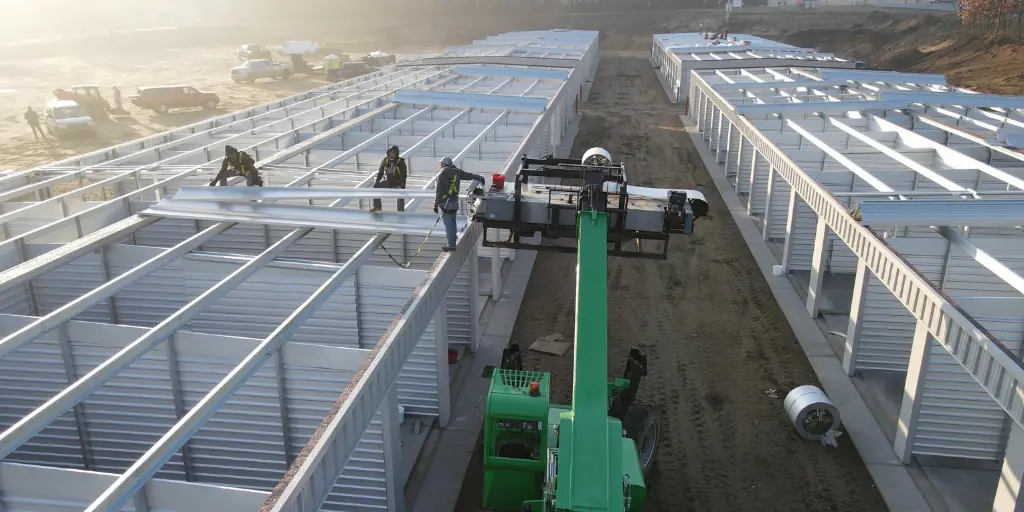
Step 4: Building Storage Units (November – December 2022)
The building construction was the most exciting stage because we finally saw these storage units take shape.
The steel was delivered as the foundations were still drying. Multiple crews worked simultaneously, making for a crowded construction site. It took 2.5 weeks to build each building, which took over a month and a half to do everything.
We worked with Storage Structures, Inc. to manufacture and install these buildings for us. One random issue was when the buildings were inadvertently constructed backward by 180 degrees due to a miscommunication between Storage Structures and our architect. I'm still not 100% sure who dropped the ball, but it didn't end up being a huge problem.
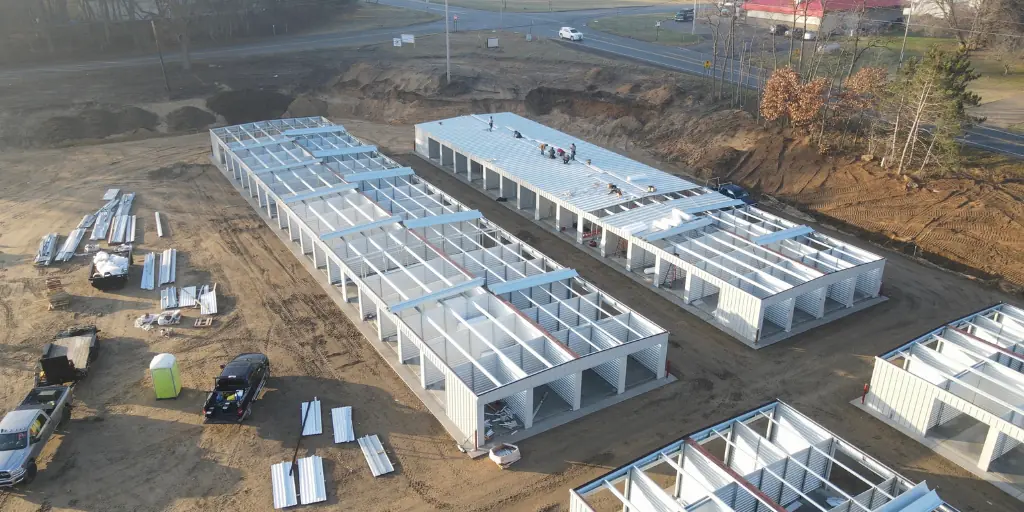
We resolved the issue by moving the interior walls on two buildings so that the units with deeper space ended up on the outside, where there was more room to back up vehicles when needed.
The metal roofs were relatively flat to handle heavy snow and save costs. Originally, these buildings were designed with gutters, but I had them removed to eliminate unnecessary maintenance. The only real downside to this is that when it rains, you'll get drips falling on you when walking in and out of each unit.
Gaps between walls and ceilings were concerning. Similar climate-controlled buildings need these for airflow, but they serve no purpose here. Filling them in later would cost $12-15k. For now, they were left as-is to avoid further costs.
We were also required to build firewalls between certain segments of each building. These were costly but important for containing potential fires from unknown stored contents.
Step 5: Doors (February 2023)
We installed 170 TracRite Model 944 doors. after the building construction was finished. These were roll-up doors with springs to make them easy to open. A local contractor mounted the hardware and hung each door individually.
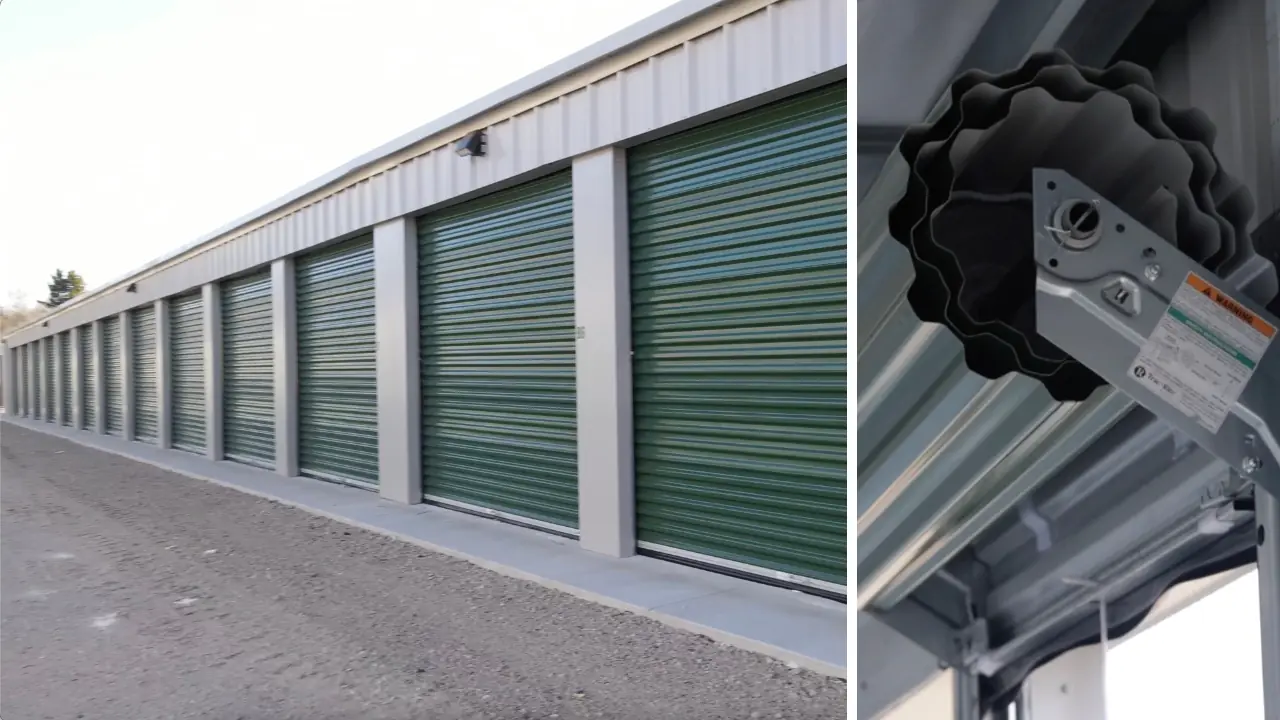
There were two door sizes for 5 ft wide and 10 ft wide units. The green color matched the facility's brand and logo perfectly, so if we build more units in the future, we'll have to order the same brand, style, and color doors from the same company to ensure they match.
Around 15 of the 170 doors had issues with the latch and side rail holes lining up, making the doors very difficult to close completely. This was worse in cold weather when the seals were brand new and harder to push down. Some improvement happened as the seals softened.
I was able to fix the issue with the right tool to increase the size of the holes cleanly. Sometimes, the holes were too big, leaving a gap at the bottom. Luckily, TracRite makes a part to adjust the lock hole position if needed.
The door experience is very important for tenants accessing their units, so resolving these issues was important, and it took a bit of extra work, as I explained in this video.
For future projects, I would use TracRite doors again because they make a great product. However, I would probably use a different door installer in my local market.
Step 6: Signage, Security Cameras & Utility Poles (Spring 2023)
In the final stages of developing this new self-storage facility, there were many challenges we had to sort out. Some of them were expected, and some of them were not.
We chose to move two power poles on the property, which was a challenging and costly endeavor. We had to pay almost $23,000 to do this, then handle residual wires from other companies.
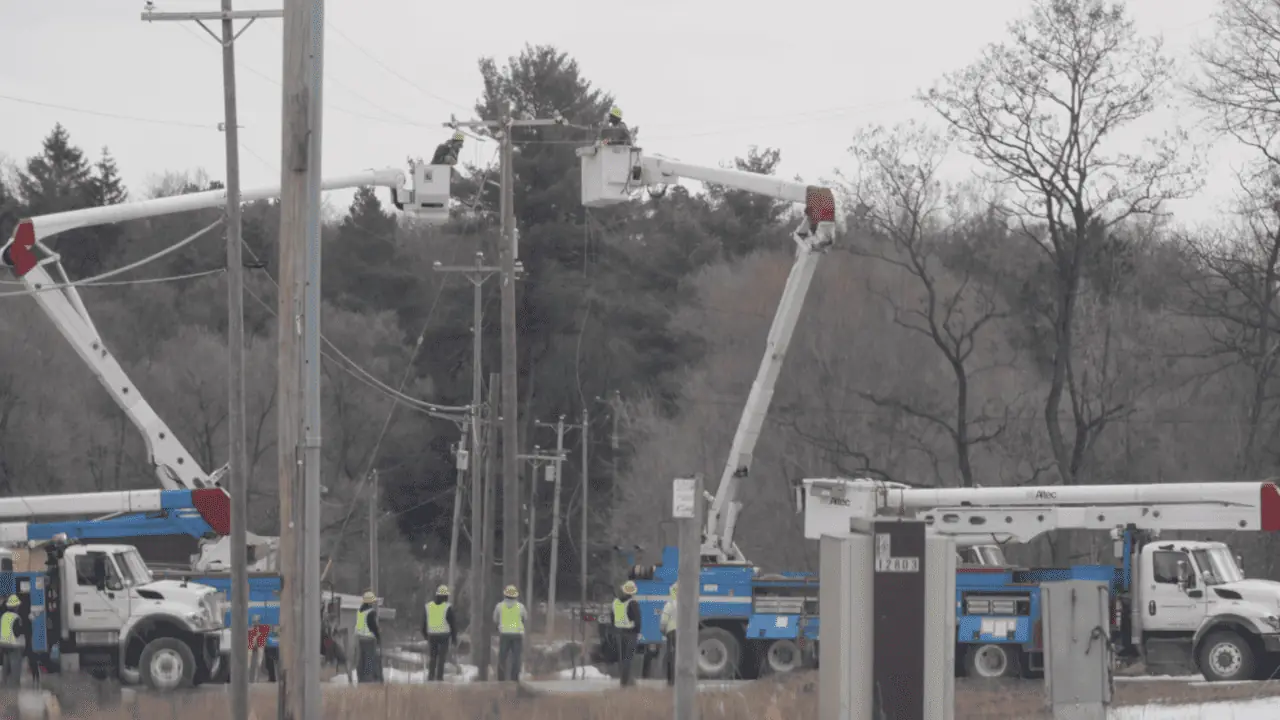
This process took five months, and in hindsight, we probably should have just left these poles in place and designed the facility to work around them.
We also installed a security camera system with 21 4K cameras.

The initial quote I got was approximately $10,500, but when all was said and done, it cost a little over $14K. The cameras connect wirelessly to an on-site hub where footage is stored and accessed remotely.
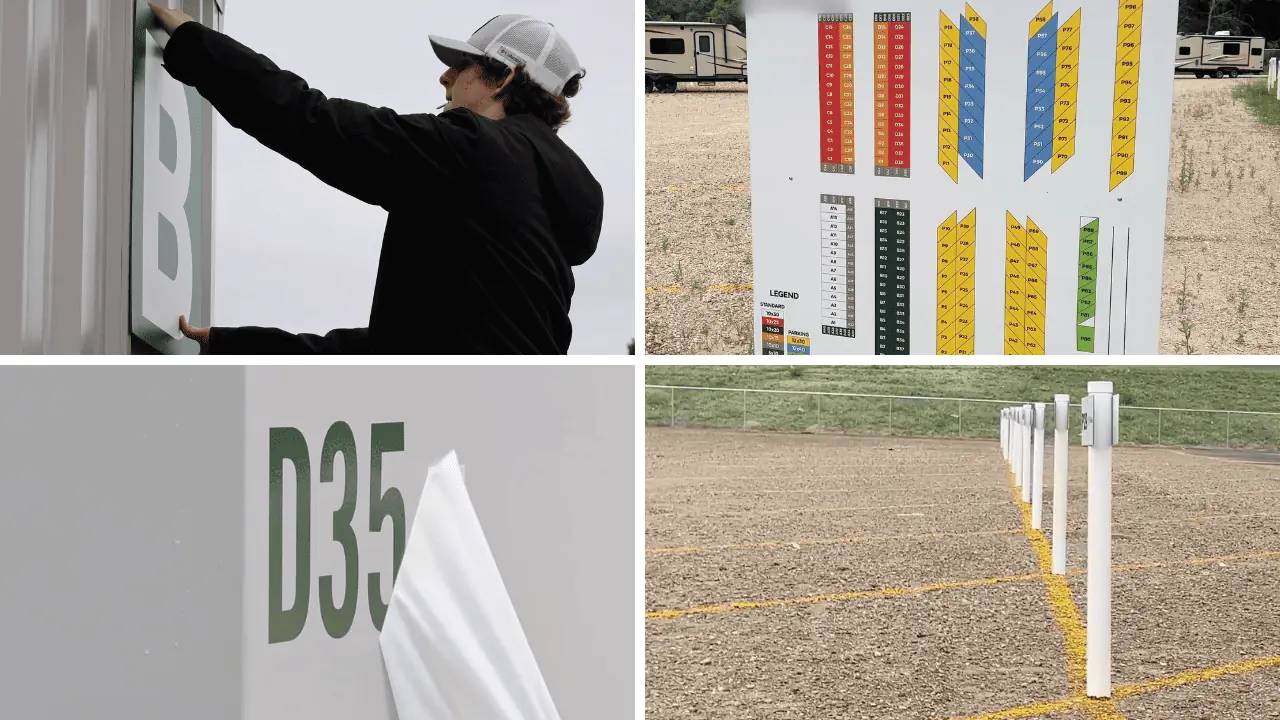
We also had to order several different signs for the facility:
- Unit number stickers
- Road signs
- Parking signs
- Building identifier signs
We used a local company called Extreme Graffix, and they did a great job installing custom signs at a reasonable price, much less expensive than quotes from other companies near us.
We could have gotten fancy illuminated signs, but we determined they weren't necessary for a storage facility like this.
Step 7: Asphalt, Parking Lot, Fence, Gate, Erosion, Software, Opening (Summer 2023)
In the final stage of developing this self-storage facility, there were a lot of finishing touches to take care of. Namely, the asphalt, erosion management, parking lot, fence, gate, and all the other odds and ends that went along with those things.
We decided to pave 1.5 inches of asphalt around the buildings, which is a bit thinner than usual. Normally, most road applications will require 3 inches of asphalt, but this would be a low-traffic application, and we could save a lot of money by only putting down a base layer like this.
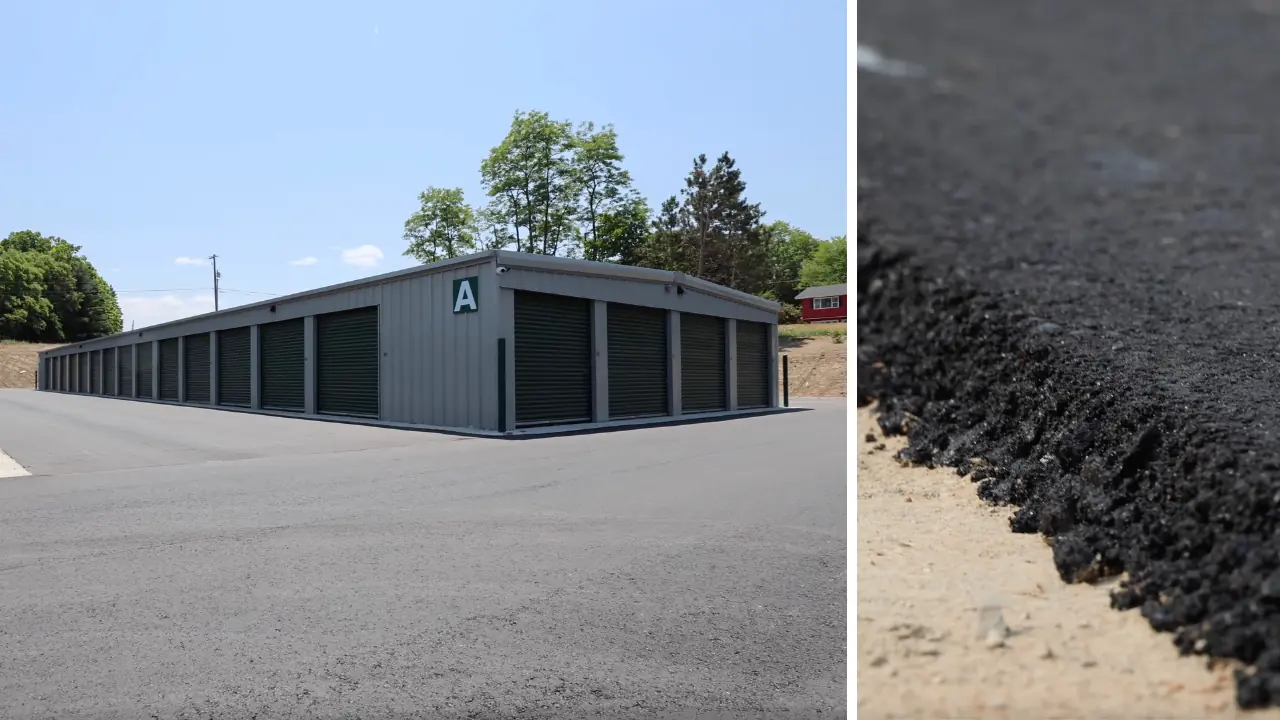
I got the idea from another storage facility owner in my area who did the same thing, and this amount of asphalt has lasted him over 15 years, so I had some reasonable assurance this would be sufficient. This asphalt costs an extra $55,000, but I think it will be a good long-term investment.
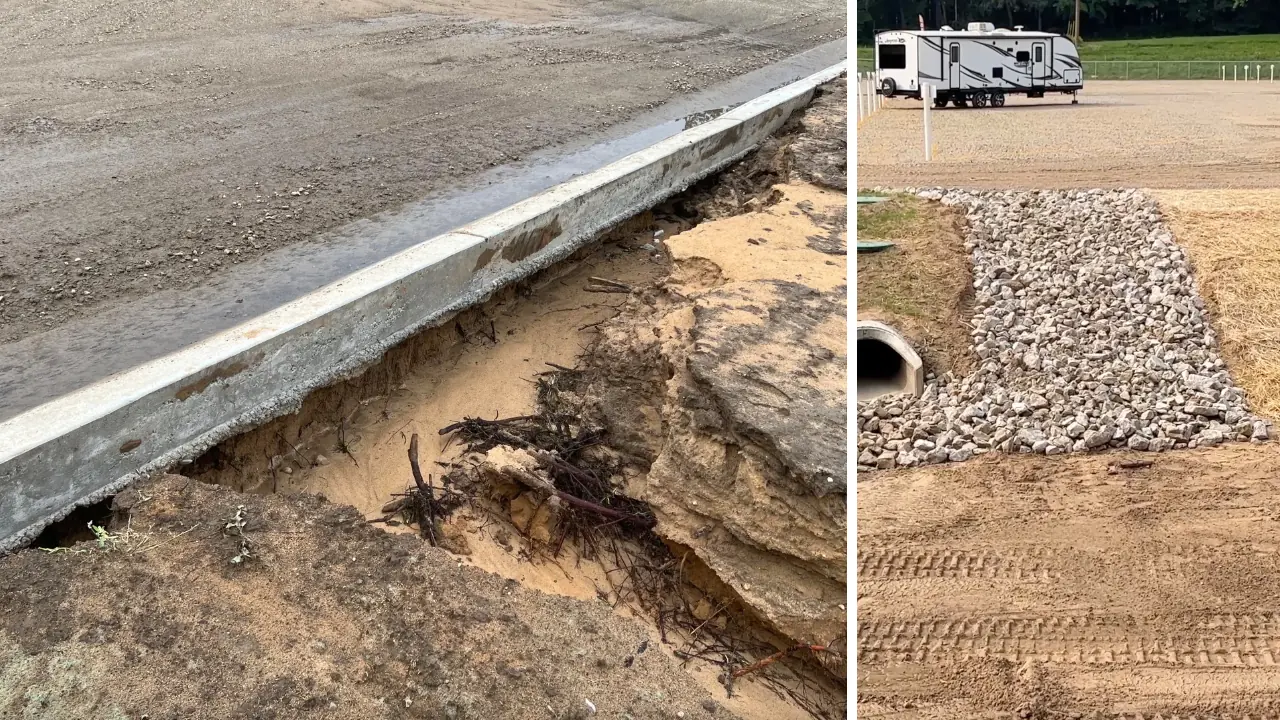
We left a gravel area for our Boat and RV parking lot, where we hope to do a future expansion once this facility has stabilized. In this area, marking the outdoor parking spaces on gravel was challenging. We put down oil-based paint and created some homemade parking posts to identify each spot, but we've noticed they tend to blow around and rotate in the wind, so I'm not sure if this will be a good long-term solution.
We had some erosion issues on the steep slopes around the site that had to be fixed with rocks and regrading.
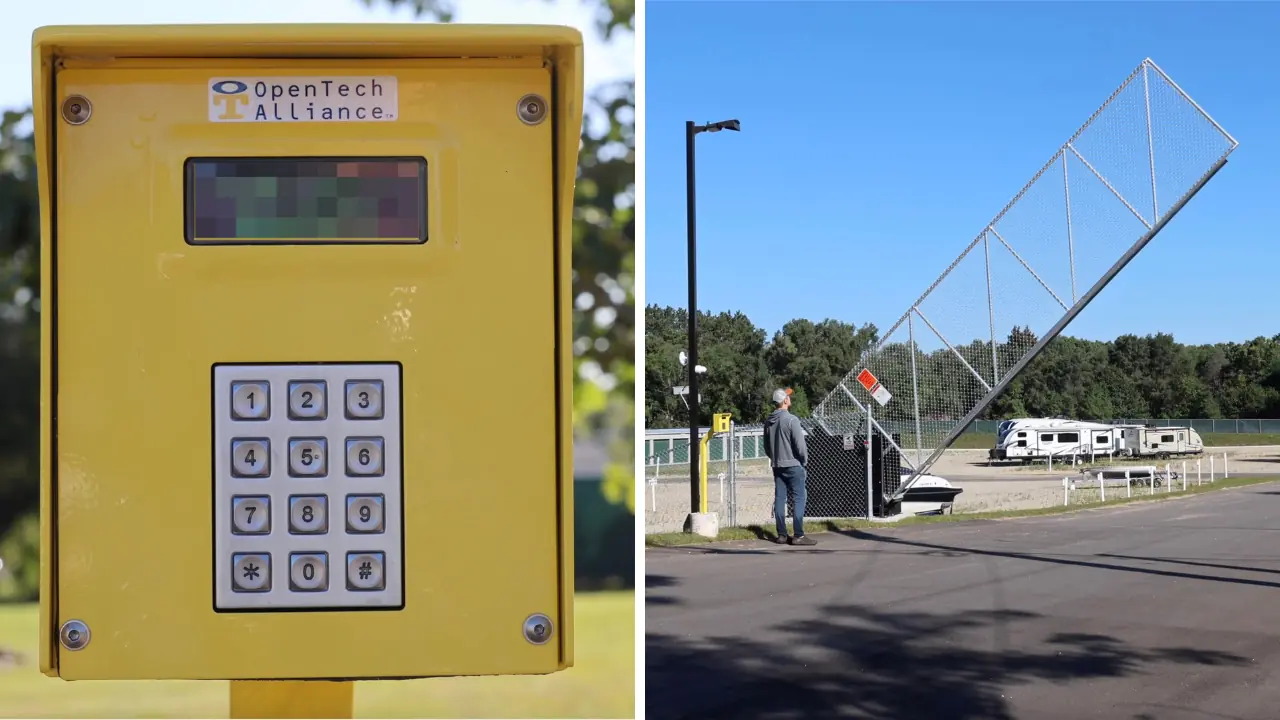
We installed a fence for security, though no fence fully prevents break-ins. It mainly creates a perception of security. Our basic 6-foot steel fence costs over $100,000, and I also hung up some privacy fabric on one section to block the view at our neighbor's request.
We installed a lift-style gate instead of a roll-style to prevent winter weather issues. The gate integrates with software to provide gate codes to tenants upon rental.
We got our temporary certificate of occupancy in the Spring, which enabled us to open one of our four buildings and start generating lease revenue as we finished construction. The timing of this was important because the summer months are much busier than the winter, so we wanted to ‘make hay while the sun shines,' so to speak.
During this wrap-up period, we filled about 40 units. When all the buildings opened, our marketing didn't need to change much because our systems were already in place.
Financial Walkthrough
The financial viability and performance of a facility like this are huge topics that, frankly, warrant an entirely separate video.
If you're curious about how I decided to build this facility (looking strictly at the numbers) and how it actually performed after we opened it, I'll discuss all of that in this video.
Would I Do It All Again?
Now that I've been through the two-year journey to building my first self-storage facility, would I do it all again?
YES! In fact, with all the incredible lessons I learned from my first experience, it would be a shame if I didn't get a chance to do it all again.
With the benefit of this experience, if I get the chance to do it again, the process would almost certainly go faster, we would have far fewer hiccups (provided I can find and hire a good general contractor and let them steer the ship from the beginning), and I could probably do it for a bit less money than I did on the first go-around.
My first self-storage development was an amazing adventure that I'll never forget.
If you ever decide to build a self-storage development of your own, I hope you were able to learn a thing or two from my experience!